1- Large disks need to have their block size specified, without it, disks like my 6TB and my 8Tb hard drives will not work, badblocks will report the following error.
badblocks: Value too large for defined data type invalid end block (5860522584): must be 32-bit value
So the solution is to add the block size, like the following for example (This one is destructive)
badblocks -b 4096 -wsv /dev/sdb
It is a good idea to LOG THE BAD SECTORS (this is the command i usually use for a destructive test)
In the command above, the W means do a destructive red-write test, the S is for show progress, and the V is for show the errors you encounter, the -o flowed by a file name is where to keep the log file
Hyper-v does not provide USB passthrough, some people use USB redirection from remote desktop RDP… A similar technology might be USB over network, but this does not always work, as many USB devices have very little tolerance for lag ! and this will introduce some lag !
My objective is to connect a MINI-VCI connected on a raspberry PI to a computer running other software to analyze the data, whether this works or not is yet to be seen.
There seems to be a few solutions online, some using generic hardware, and some using specialty hardware
The most diverse of those solutions that can work on everything from a raspberry pi to a windows computer and android phone is (https://www.virtualhere.com/), but I have not yet verified whether this software is USB/IP compatible or not
USB/IP has been built into the linux kernel for some time now, and a couple of solutions for both server and client are available on github, So here I will be investigating what I can do to bridge the Linux Raspberry PI to my windows PC,
USBIP is a protocol where the server is the machine connected to the USB device via wire, and the client is the machine that needs to use the USB device but is not connected to it via USB.
In linux, usbipd is the name of the server, and usbip being the client, In debian, both server and client are included in the usbip package, hence, on the raspberry PI and on the Linux server, we need to run the command
apt-get install usbip
The modules of USB/IP (usbip-core, usb-host, and vhci-hcd) are already included,
We will get to the Windows client after the Linux to Linux section
The two options
In the cases we are exploring here, the server is a Raspberry Pi (3), the client is a Windows machine, but there are a couple of things to try first, the Windows clients are KVM virtual machines, we will try
1- The client is the Linux Host machine hosting the windows virtual machines, and the USB port is passed to the virtual machine
OR
2- The Windows client has the USBIP driver directly connecting to the Raspberry PI server
The Steps
Installing the USB/IP server on the raspberry pi “apt-get install usbip”
The full version of this, with an explanation of everything is here, this one is written for copy-paste and speed.
This version is meant to create unprivileged LXC containers owned by root subordinates, which in my opinion provides the best balance of security and flexibility.
Install Debian 12 (bookworm) on a computer or virtual machine or what have you.
I personally enable root access under SSH, so all the commands you see here are run as root, you may use another user with sudo if you wish, but i execute as root
Execute the following to install LXC (I am installing LXC and KVM) but you might want to remove KVM
For website speed, I am considering tailwind, a CSS framework that acts more like a library than a framework.
I will be adding my notes here, and the links at the bottom.
Which is better, tailwind or bootstrap
Well, like i said above, you are comparing apples to oranges, while it is very easy to spot a bootstrap theme when you see one, tailwind is more like CSS extended, so you have elements that you can use in your design, but your design is yours 😉
All you need for developing in TailWind is your CSS editor (VS Code in this post), then you will need NodeJS, and NPM to generate the production CSS and minify it
I will create a few ultra simple files for you to learn the process,
the HTML file: Where you add your HTYML
The tailwindCSS file, from which the production CSS file is copied.
The NPM config file and the tailwind config file WHICH YOU CAN SIMPLY COPY FROM HERE and modify if needed
I personally use Debian Linux, everything should be identical on Windows and Mac, I will assume you are using the command line on Linux, but if you open the command prompt on windows, it should work exactly the same way
IMPORTANT NOTE: This is the full version, if you just want to come in, copy some commands, and end up making unprivileged containers under root, THERE IS A SEPARATE POST FOR THAT HERE.
0- Intro
Don’t let the length fool you, I am trying to make this the simplest and fastest yet most comprehensive tutorial to having LXC (both privileged and unprivileged) up and running on debian bookworm !
I sent a previous version of this to a friend to spare myself the need to explain to him what to do, and he found the tutorial confusing ! instead of the old arrangement, having colors to denote what lines are for what task, I have decided to SEPARATE THIS INTO PARTS….
Intro – About this post (You are already in it)
LXC info
Shared system setup (Privileged and unprivileged)
Privilaged LXC step by step
Shared setup for unprivileged containers
Unprivileged LXC run by new user, step by step
Unprivileged LXC run by root user, step by step
I hope this clears things up, the color codes will still exist, mostly because I have already done the work !
Why yet another tutorial ?
Most of the tutorials online focus on creating an extra user to use with LXC, that is one way to do it with a few drawbacks, the other way is to create a range of subordinate IDs for the root user, the advantages of this way of doing it are related to “Autostart” and filesystem sharing between host and guest.
As per usual, the primary goal of every post on this blog is my own reference, the internet is full of misleading and inaccurate stuff, and when i come back to a similar situation, I don’t want to do the research all over again.
Long gone are the days where you published a simple page and search engines sent you traffic, in this day and age, even that page, no matter how important the content in it is, needs to be on a website that meets certain criteria
Privacy Policy: A privacy policy is essential, I will enumerate all the things that you will lose for not having a privacy policy right after this list
Cookie banner: or any notification in general, asking the user for consent to use cookies
Mobile and small screen compatibility: the most common form of that is a responsive design, no design at all can often be responsive as well, but that is a different topic altogether, this compatibility also includes the spacing of clickable content as well as showing elegantly on the small screens
Speed: Search engines seem to like faster websites more, it improves their visitor’s experience
Create distinctive favicons of various sizes, they help people identify your website in search results and other places, so whether they are looking for something they have seen on your website before, or want to find the tab in their browser, you make it easy for them
So you have a budget SSD, something like the Kingston A400, and half way through a multi gigabyte file it slows down !
Coming to think about it, this SSD does not have a DRAM cache, and should be slower but more consistent, right ? after all, you can’t run out of cache when there is no cache !
The answer is NO, just because it does not have RAM cache or even actual SLC flash, does not mean it is writing casually to its MLC flash, the controller uses trickery to speed up writing and sometimes reading
Most drives with no RAM cache (Examples below) use a method called Single Level Cell mode cache, but even this name is misleading, your cheap hard drive does not have “Single Level Cell flash memory” inside of it, Instead, it utilizes it’s own MLC by writing single entries to it (One bit of a multi level cell), then re-copying it the normal way
When you are copying a large file to the disk, all the blank space at that level has been consumed, and the disk is now writing directly to the 3 dimensional MLC flash, which is, in most cases, slower than a mechanical hard drive for sequential write !
The most common of such a controller is the Phison PS3111-S11-13, it is a relatively good controller if your purpose does not require super fast SSDs, the controller has some cool features including Bad Block management (Spare flash that automatically replaces bad cells), besides standard features like S.M.A.R.T., It also supports native command queuing (NCQ), EEC error correction, so all in all, this post is not advice to stay away, this post is just hee to explain that it will be slow
Examples of such disks:
Kingston A400
– 240GB = Phison PS3111-S11-13
Silicon Power A55
– 1TB = Phison PS3111-S11-13
HIKVISION C100 – 120GB = MAS0902. (Basically a JMicron controller), and while the controller seems okay, at least on paper, I can not seem to be able to figure out the 64GB x 2 chips that read (TZA512G221 060422JC JWT5220364RB) To decode the chips, we can use the JMicron identify and the JMicron flash id programs
The Maxio MAS0902 SATA DRAMless controller. comparable to the (Phison PS3111) but has some interesting tech upgrades, 1- AgileECC 2 (2nd gen ECC) 2- WriteBooster 2 (2nd gen SLC write buffer), DEVSLP (low-power mode), power and thermal throttling, and end-to-end data protection. The controller also supports both TCG-Opal 2.0 and Microsoft’s eDrive (IEEE1667) full disk data encryption.
First of all, the choice depends on 3 things, or 4 but to me, the fourth is not very important
PRICE for a given TLD (TLD = .com, .net, etc…) and it’s persistence This is probably the most important factor, there is no such thing as “Performance” as your registrar does not run the TLD’s registry, something to take into account is also the renewal price next year.
whether or not you plan to use their “Usually free” nameservers (Most people will use their web host’s nameservers and not the registrar’s)
The business stability of the registrar, when a registrar goes down, you might find your domains with a registrar who picked up all the domains the sunken registrar had, and if you were using the old registrar’s add on services, you will end up needing to redo them, and probably find a different registrar that you like to move those domains to.
And last but not least, the interface and speed of the registrar’s website and tools, I don’t think this is very important as most registrars have a usable interface and you will only need to use it infrequently
Which one do i recommend ?
I personally use more than one registrar, for some TLDs, I use nameCheap, and for the more standard domain TLDs (Like .COM etc…) I usedgodaddy for a long time, then i switched to a godaddy reseller (PoloDomains), it has the same exact products (and phone support) as godaddy and in my experience this reseller has very persistent prices that are lower than those of godaddy themselves, not to mention that godaddy keeps surprising me with different pricing when the time comes to renew. Again, godaddy is a good registrar that checks all the boxes, but the reseller is more or less just cheaper. other good well known registrars include namesilo.com, google domains (Not recommended as google is selling it to another company), Name.com, domain.com and many others that you can research online…
Get it for free when it makes sense
Some web hosts offer free domain names for as long as you are paying for your hosting, this is not exactly a catch, but it might be, so what I do is decide on a web host through reviews and what have you, and if that web host offers free or cheap domains with their web hosting, then that is where I will get my domain, But mind you, when i make the choice, i subtract 1/12 of the normal domain price (that you would get if you used a separate registrar) from the monthly hosting fee, and then compare the web-hosts with the new discounted price tag, the last thing i want is to get stuck with a bad web host because they offer a free domain, that would be a very bad decision.
When is the registrar relevant to performance ?
The main function of a registrar is to sell you domains and register them with a registry, after registering them, the registrar also informs the registry of what nameservers to use with the domain name. after that, the registrar in it’s strict form has no technical function, up until you either want to renew that domain, or change the nameservers attached to that domain, a web request (from a website visitor for example) does not pass through your registrar.
The above remains true, unless you opt to use one of those free DNS services that are provided by many registrars, in this scenario you are using the registrar’s DNS servers instead of your host’s or a third party, which is not a bad idea depending on the quality of your registrar, godaddy (and it’s resellers) provides a free DNS service that uses anycast ! anycast is a cool internet technology where the user will be using the closest DNS server to them without knowing, effectively cutting down the latency of the DNS request.
if you are processing data with nginx and PHP-FPM, you might want to increase the following
“504 Gateway Timeout” is when nginx is waiting for a response from php-fpm for too long, you can fix that with
Increase PHP maximum execution time in /etc/php.ini: max_execution_time = 300 Increase PHP-FPM request terminate timeout in the pool configuration (/etc/php/8.2/fpm/pool.d/www.conf): request_terminate_timeout = 300
To disable all timeouts… you can add the following into any context, for serverwide, add anywhere in the http context (in /etc/nginx/nginx.conf)
Before you change values in php.ini, you need to tweak nginx a bit, so you need to start by editing the nginx config file at /etc/nginx/nginx.conf, and at the bottom of the http block, you may want to do the following
Now, the above should be higher than the php max upload and max post sizes, if you like, you can disable the nginx restriction by setting them to zero !
Now, go for your php file that you can find in a place such as (/etc/php/8.2/fpm) and edit the values, for example
My answer here is a bit unconventional, and certainly not a fact.. I even think I am wrong, but it can’t hurt, so here it goes
Seagate recommends you update the disk’s firmware to improve performance and longevity of the hard drive, I on the other hand have an extra mission…
The firmware on a hard drive is stored partially on a chip on the PCB, and partially on the disk itself ! I know that disk platters have a data retention life of 10 years, the area where the firmware is written is never refreshed since it is read only when the disk boots up, So i am hoping (even though doubtful) that the firmware update might re-write this area of the disk and breath new life into it.
A disk certain application claims to refresh the data on that area of the disk, After testing that application I will come here and add my findings accordingly
Getting the firmware
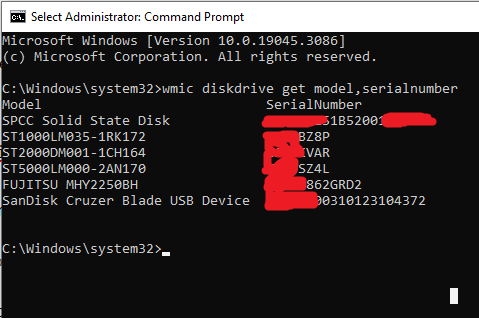
Let us start by downloading the firmware ! To download firmware from seagate’s website, you will need to know your hard drive serial number, to do just that, open the command prompt elevated, and run the following command
wmic diskdrive get model,serialnumber
The result of me running that command is as follows
The results of executing the command above show that I have a hard drive of the model (ST2000DM001-1CH164) as you can see with a serial number that I now have (Masking serial numbers just in case seagate has a problem with me publishing them as it allows you to download the firmware using the serial number)…..
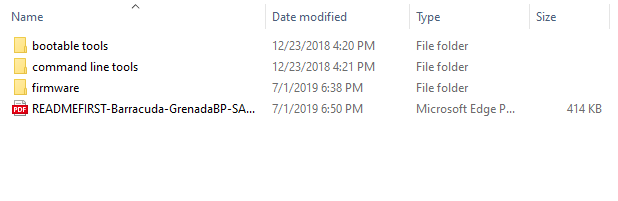
Now that I have the serial number, I can go to seagate’s firmware download page here and grab the firmware… once done, I unzip it, and the following folders appear
Creating a bootable USB flash disk
Now, inside the Bootable tools, there is a file (SeaChest_RC_2.7.4_10-18-2018.usbBootMaker.exe) that will create a bootable flash stick for you, insert a flash stick of any size that is to be deleted by this application, run the application, and now you have a bootable drive, but without the firmware, so copy the firmware folder you see above into the flash stick, and now you are ready to boot from it, for instructions how to boot from a flash stick, you will need to check with your motherboard’s manufacturer documentation, it is usually a simple thing such as hitting F11 at boot time.
Updating the firmware
Once booted, you should be presented with a linux command prompt, where we can run commands to update the firmware
To see what disks are on your system, run the following command
SeaChest_Firmware --scan
The scan should give you the handle for the drive, if you have never used linux before, the handle started with /dev/ (Short for device), and sata disks usually start with sdX (Where X starts with A and ends with a letter corresponding to the last disk you have in your system) old PATA disks usually start with hdX… but that is usually not something you need as PATA disks are virtually non existent at this stage
Now, if you want to know whether the update was successful or not, just run the scan command again, and note the firmware on it !
My Problem !
As you can see from the image below, I have 3 firmware files, named 1TB, 2TB, and 3TB, when i ran the command above, The system claimed that the update was successful, but didn’t really update the firmware, I was still stuck with 26 rather than 29 !
So i decided to use Seagates own configuration file to do the update with the command
model matched but the current firmware version does not match the available updates
So, I went back in time and remembered that for this particular disk, I had changed the PCB before (Trying to get a 3TB disk to work by moving a certain chip from one board to the other, diagnosis turned out the problem is not the PCB)… So instead of flashing the 2TB firmware file, I flashed the 3TB, and what do you know, It worked.
Anyway, I will come back with screenshots of the whole thing… and more data for those who are having trouble updating their firmware, until then, hang in there
We use cookies to ensure that we give you the best experience on our website. If you continue to use this site we will assume that you are happy with it.Ok