The maximum power draw a PC with many hard drives happens at boot time, in my case, the PC is a n intel atom D525MW, which hardly draws any power
What this means is that I need an oversized power supply that only does its thing at startup, then becomes an inefficient power supply right after, why this is particularly important is because this computer runs on a UPS, and the number of minutes it can stay up is a very important number.
The solution is to enable PUIS (Power up in standby), what this does is allow the disks not to spin as soon as they get power, but instead, spin up upon reception of a command from the controller. so in effect, the disks are spun up sequentially (In turn).
So, after a lot of research that lead to nothing, I installed the GT 710 card on a PC and fired up a youtube browser window, changed the settings to 4K, and found a bunch of rapidly moving 4K videos.
Even without H265 and VP9, the videos play fine on my 4K screen with 4K resolution settings, hope this helps
This disk was around 40GB, but fdisk will see the number corresponding to the largest allowed size, 100GB in this case ! let us mount the drive
mount /dev/nbd0p2 /hds/loop
Now, in this case in particular, like any other block device that held the windows operating system, more often than not, you will get the message saying
The disk contains an unclean file system (0, 0).
Metadata kept in Windows cache, refused to mount.
Falling back to read-only mount because the NTFS partition is in an
unsafe state. Please resume and shutdown Windows fully (no hibernation
or fast restarting.)
Could not mount read-write, trying read-only
The solution to that is simple, follow the following two steps to remedy the issue and then force mount the file by using remove_hiberfile
ntfsfix /dev/nbd0p2
mount -t ntfs-3g -o remove_hiberfile /dev/nbd0p2 /hds/loop
The result of NTFSFIX was
Mounting volume... The disk contains an unclean file system (0, 0).
Metadata kept in Windows cache, refused to mount.
FAILED
Attempting to correct errors...
Processing $MFT and $MFTMirr...
Reading $MFT... OK
Reading $MFTMirr... OK
Comparing $MFTMirr to $MFT... OK
Processing of $MFT and $MFTMirr completed successfully.
Setting required flags on partition... OK
Going to empty the journal ($LogFile)... OK
Checking the alternate boot sector... OK
NTFS volume version is 3.1.
NTFS partition /dev/nbd0p2 was processed successfully.
And the following mount command worked as you would expect, silently
Now, if you want to disconnect the NBD image, you need to unmount (Like you normally would) THEN
#Disconnect the image from the NBD device
qemu-nbd --disconnect /dev/nbd0;
#Unload the NBD module
rmmod nbd;
1- Large disks need to have their block size specified, without it, disks like my 6TB and my 8Tb hard drives will not work, badblocks will report the following error.
badblocks: Value too large for defined data type invalid end block (5860522584): must be 32-bit value
So the solution is to add the block size, like the following for example (This one is destructive)
badblocks -b 4096 -wsv /dev/sdb
It is a good idea to LOG THE BAD SECTORS (this is the command i usually use for a destructive test)
In the command above, the W means do a destructive red-write test, the S is for show progress, and the V is for show the errors you encounter, the -o flowed by a file name is where to keep the log file
Hyper-v does not provide USB passthrough, some people use USB redirection from remote desktop RDP… A similar technology might be USB over network, but this does not always work, as many USB devices have very little tolerance for lag ! and this will introduce some lag !
My objective is to connect a MINI-VCI connected on a raspberry PI to a computer running other software to analyze the data, whether this works or not is yet to be seen.
There seems to be a few solutions online, some using generic hardware, and some using specialty hardware
The most diverse of those solutions that can work on everything from a raspberry pi to a windows computer and android phone is (https://www.virtualhere.com/), but I have not yet verified whether this software is USB/IP compatible or not
USB/IP has been built into the linux kernel for some time now, and a couple of solutions for both server and client are available on github, So here I will be investigating what I can do to bridge the Linux Raspberry PI to my windows PC,
USBIP is a protocol where the server is the machine connected to the USB device via wire, and the client is the machine that needs to use the USB device but is not connected to it via USB.
In linux, usbipd is the name of the server, and usbip being the client, In debian, both server and client are included in the usbip package, hence, on the raspberry PI and on the Linux server, we need to run the command
apt-get install usbip
The modules of USB/IP (usbip-core, usb-host, and vhci-hcd) are already included,
We will get to the Windows client after the Linux to Linux section
The two options
In the cases we are exploring here, the server is a Raspberry Pi (3), the client is a Windows machine, but there are a couple of things to try first, the Windows clients are KVM virtual machines, we will try
1- The client is the Linux Host machine hosting the windows virtual machines, and the USB port is passed to the virtual machine
OR
2- The Windows client has the USBIP driver directly connecting to the Raspberry PI server
The Steps
Installing the USB/IP server on the raspberry pi “apt-get install usbip”
So you have a budget SSD, something like the Kingston A400, and half way through a multi gigabyte file it slows down !
Coming to think about it, this SSD does not have a DRAM cache, and should be slower but more consistent, right ? after all, you can’t run out of cache when there is no cache !
The answer is NO, just because it does not have RAM cache or even actual SLC flash, does not mean it is writing casually to its MLC flash, the controller uses trickery to speed up writing and sometimes reading
Most drives with no RAM cache (Examples below) use a method called Single Level Cell mode cache, but even this name is misleading, your cheap hard drive does not have “Single Level Cell flash memory” inside of it, Instead, it utilizes it’s own MLC by writing single entries to it (One bit of a multi level cell), then re-copying it the normal way
When you are copying a large file to the disk, all the blank space at that level has been consumed, and the disk is now writing directly to the 3 dimensional MLC flash, which is, in most cases, slower than a mechanical hard drive for sequential write !
The most common of such a controller is the Phison PS3111-S11-13, it is a relatively good controller if your purpose does not require super fast SSDs, the controller has some cool features including Bad Block management (Spare flash that automatically replaces bad cells), besides standard features like S.M.A.R.T., It also supports native command queuing (NCQ), EEC error correction, so all in all, this post is not advice to stay away, this post is just hee to explain that it will be slow
Examples of such disks:
Kingston A400
– 240GB = Phison PS3111-S11-13
Silicon Power A55
– 1TB = Phison PS3111-S11-13
HIKVISION C100 – 120GB = MAS0902. (Basically a JMicron controller), and while the controller seems okay, at least on paper, I can not seem to be able to figure out the 64GB x 2 chips that read (TZA512G221 060422JC JWT5220364RB) To decode the chips, we can use the JMicron identify and the JMicron flash id programs
The Maxio MAS0902 SATA DRAMless controller. comparable to the (Phison PS3111) but has some interesting tech upgrades, 1- AgileECC 2 (2nd gen ECC) 2- WriteBooster 2 (2nd gen SLC write buffer), DEVSLP (low-power mode), power and thermal throttling, and end-to-end data protection. The controller also supports both TCG-Opal 2.0 and Microsoft’s eDrive (IEEE1667) full disk data encryption.
My answer here is a bit unconventional, and certainly not a fact.. I even think I am wrong, but it can’t hurt, so here it goes
Seagate recommends you update the disk’s firmware to improve performance and longevity of the hard drive, I on the other hand have an extra mission…
The firmware on a hard drive is stored partially on a chip on the PCB, and partially on the disk itself ! I know that disk platters have a data retention life of 10 years, the area where the firmware is written is never refreshed since it is read only when the disk boots up, So i am hoping (even though doubtful) that the firmware update might re-write this area of the disk and breath new life into it.
A disk certain application claims to refresh the data on that area of the disk, After testing that application I will come here and add my findings accordingly
Getting the firmware
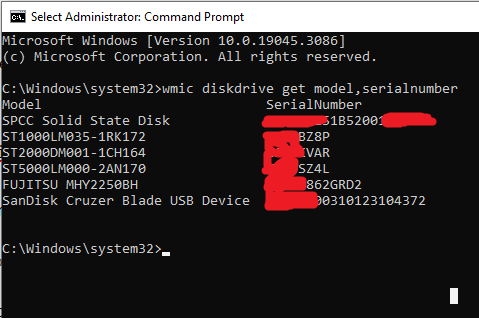
Let us start by downloading the firmware ! To download firmware from seagate’s website, you will need to know your hard drive serial number, to do just that, open the command prompt elevated, and run the following command
wmic diskdrive get model,serialnumber
The result of me running that command is as follows
The results of executing the command above show that I have a hard drive of the model (ST2000DM001-1CH164) as you can see with a serial number that I now have (Masking serial numbers just in case seagate has a problem with me publishing them as it allows you to download the firmware using the serial number)…..
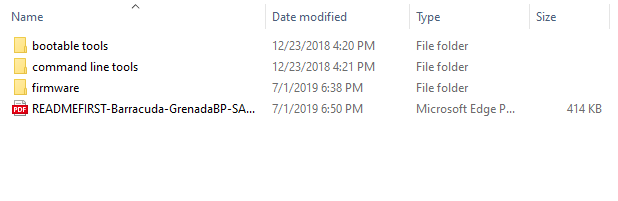
Now that I have the serial number, I can go to seagate’s firmware download page here and grab the firmware… once done, I unzip it, and the following folders appear
Creating a bootable USB flash disk
Now, inside the Bootable tools, there is a file (SeaChest_RC_2.7.4_10-18-2018.usbBootMaker.exe) that will create a bootable flash stick for you, insert a flash stick of any size that is to be deleted by this application, run the application, and now you have a bootable drive, but without the firmware, so copy the firmware folder you see above into the flash stick, and now you are ready to boot from it, for instructions how to boot from a flash stick, you will need to check with your motherboard’s manufacturer documentation, it is usually a simple thing such as hitting F11 at boot time.
Updating the firmware
Once booted, you should be presented with a linux command prompt, where we can run commands to update the firmware
To see what disks are on your system, run the following command
SeaChest_Firmware --scan
The scan should give you the handle for the drive, if you have never used linux before, the handle started with /dev/ (Short for device), and sata disks usually start with sdX (Where X starts with A and ends with a letter corresponding to the last disk you have in your system) old PATA disks usually start with hdX… but that is usually not something you need as PATA disks are virtually non existent at this stage
Now, if you want to know whether the update was successful or not, just run the scan command again, and note the firmware on it !
My Problem !
As you can see from the image below, I have 3 firmware files, named 1TB, 2TB, and 3TB, when i ran the command above, The system claimed that the update was successful, but didn’t really update the firmware, I was still stuck with 26 rather than 29 !
So i decided to use Seagates own configuration file to do the update with the command
model matched but the current firmware version does not match the available updates
So, I went back in time and remembered that for this particular disk, I had changed the PCB before (Trying to get a 3TB disk to work by moving a certain chip from one board to the other, diagnosis turned out the problem is not the PCB)… So instead of flashing the 2TB firmware file, I flashed the 3TB, and what do you know, It worked.
Anyway, I will come back with screenshots of the whole thing… and more data for those who are having trouble updating their firmware, until then, hang in there
mount /dev/sdd1 /hds/sgt2tb
The disk contains an unclean file system (0, 0).
Metadata kept in Windows cache, refused to mount.
Falling back to read-only mount because the NTFS partition is in an
unsafe state. Please resume and shutdown Windows fully (no hibernation
or fast restarting.)
Could not mount read-write, trying read-only
The command
ntfsfix /dev/sdd1
resolves the issue, and produces the following message
Mounting volume... The disk contains an unclean file system (0, 0).
Metadata kept in Windows cache, refused to mount.
FAILED
Attempting to correct errors...
Processing $MFT and $MFTMirr...
Reading $MFT... OK
Reading $MFTMirr... OK
Comparing $MFTMirr to $MFT... OK
Processing of $MFT and $MFTMirr completed successfully.
Setting required flags on partition... OK
Going to empty the journal ($LogFile)... OK
Checking the alternate boot sector... OK
NTFS volume version is 3.1.
NTFS partition /dev/sdd1 was processed successfully
The same mount command you see here will now work flawlessly
mount /dev/sdd1 /hds/sgt2tb
I am still unsure what process from the mentioned above is responsible, as this oftentimes pops up on drives that were never system drives, so there is no hibernation file problem
The answer to this should be simple, I initiated the test with
badblocks -nsv /dev/sdb
, first, interrupt bad blocks with ctrl+c, the output should be
Checking for bad blocks in non-destructive read-write mode
From block 0 to 1953514583
Checking for bad blocks (non-destructive read-write test)
Testing with random pattern:   0.92% done, 49:38 elapsed. (0/0/0 errors)
 21.32% done, 18:49:24 elapsed. (0/0/0 errors)

Interrupted at block 416437376

Interrupt caught, cleaning up
Okay, so we know what blocks it was supposed to check (1 through 1953514583), and where it was interrupted (416437376)
So i will ask it to resume testing from where it finished (-1), up to the end
badblocks -nsv /dev/sdb 1953514583 416437375

n = Non destructive
s = Show progress
v = tell us about what you find !
The new run should tell you the percentage correctly, but the time counter will be reset to zero, as it is only counting how long this run has been running for
One thing to note is that bad blocks can be used to instruct the filesystem to avoid the bad blocks, but it also allows the disk’s firmware to substitute bad blocks with spare blocks, so that the disk works again with no intervention from your end !
The concatenation of those files you are creating is very useful in creating a file system if you ever decide to format the drive later !, but the recommended way is using badblocks with the other disk tools directly
while the test is running, you will see 3 numbers that correspond to readerror/writeerror/corruptionerror
Update: the official winner in this is the ASUS, mainly for having built in speakers Update: After buying the LG for myself and the ASUS for a friend, The ASUS does pivot 90 degrees as well !!! the only real advantage i see in the LG is the IPS display (Color accuracy for graphics designers that you will not be able to detect with the untrained eye)
Because the place where i buy my monitors currently only has 2 4K monitors in the 27″ category, I had to compare them to pick one, for most people the ASUS is the clear winner, unless you are a graphics designer, then it is the LG (IPS has better color), I will probably buy the LG because of it’s Pivot feature (UPDATE-They both have pivot), but most people would want the ASUS, in any case, here are the specs for both side by side
The reason the LG is more expensive is because it has IPS, IPS has only one advantage, color, and only to a degree that affects a graphics designer, in fact, IPS has disadvantages too compared to TN (twisted nematic).
3 (2.0) but can only find 2 in manual, manual is for whole series
2 (No mentioning, but most likely 2.0a or 2.1)
DP
1 = 1 (1.2)
1 (No mentioning of Version)
HEADPHONE
1
1
BRIGHTNESS
300cd/㎡
300cd (typ) / 240cd (Min)
CONTRAST
1000:1 (MIN/TYP)
700:1 (Min.), 1000:1 (Typ.)
COLOR
10BIT (1073.7M) – 94%sRGB
IPS has better color
HDR
10
Power Consumption (Typ.)
<31
36 – 41
POSITIONS
Tilt : Yes (+20° ~ -5°), Pivot(Not auto)
Tilt (3°)/Height (Lower and raise)/Pivot(Not auto)
VESA MOUNTING
NO
YES
NVIDIA/AMD
Radeon FreeSync
Radeon FreeSync™
SPEAKERS`
YES 2W X 2
NO
Buttons
Joystick
Joystick
power adapter
Internal (Thicker, and less heat management)
external, 19v, 2a
dimensions with stand
660.4 x 672.5 x 226.3 mm
622.6 mm x 572.2 mm x 230.0 mm
dimensions without stand
660.4 x 380.8 x 62.2 mm
622.6 mm x 371.0 mm x 45.8 mm
Blue light filter
Yes
No
OSD
Nicer and easier
Does the job perfectly, but less nice
The stand is also something i like about the LG, even though it takes more space on the desk, the space is not completely taken by the stand, the half oval shape allows you to put your things on the table within the stand, it also has some height adjustment (just a bit, for the portrait pivot mode mostly so it is not so much a standing desk in any way) that allows me to raise it a bit when i need to for more comfort
We use cookies to ensure that we give you the best experience on our website. If you continue to use this site we will assume that you are happy with it.Ok