2.5MM audio jacks

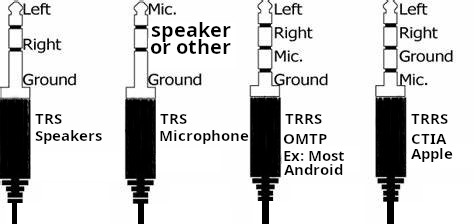
2 pin connector TS (tip, sleeve)
3 pin connectors, TRS (tip, ring, sleeve)
4 pin connectors, TRRS (tip, ring, ring, sleeve)

TRRS

Two standards exist for TRRS (4 Pin)

CTIA, which you can think of as apple, and i will call it apple throughout the post to help you focus on what matters, and OMTP, Which is everything else which i will call Android from here on.

For android (And almost any non apple device), the sleeve (Pin closest to the wire) is the ground, and the ring right above it would be the microphone… the other ring and the tip are the two speakers, right and left, In apple’s setup, the ground and microphone are switched together !

TRS

In a 3 pin connector (TRS), When it is meant to carry microphone signal, the tip is the microphone signal, the sleeve is still the ground, and the ring may carry any other signal such as a single speaker channel.

Music players for android

When it comes to MP3 players, there is definitely no shortage, but finding a good one is a task

Here are the most popular one, each with it’s advantages and disadvantages

Retro Music Player

Open source: github
Available on google play and F-Droid
Elegant, plays music files and does not do much more
Appears to be written in Kotlin

Fossify Music Player

Open Source: Github
Available on Google Play and F-Droid
Elegant, plays music files and does not do much more
Appears to be written in Kotlin

Editing Music ID3 tags

id3 tags were meant to be a simple way to store metadata in MP3 files, slowly but steadily, things became a bit more complicated

Originally, ID3 tags were meta data near the end of a file, then ID3V2 came along, and meta tags were moved to the beginning (With an ID3V1 copy at the end added by most ID3 editors)

Album artwork is another complication, As it may be embedded in the file, An older method used to depend on keeping an image called “cover.jpg” in the folder where the file is stored.

You can also have “user-defined fields”, which can be helpful if you are developing a music player that has some novel ideas

ID3 tag information can be obtained from gnudb.org, MusicBrainz, Discogs, Amazon

Gnome

  • EasyTAG: GIT = tag editor for MP3, Ogg Vorbis files and more
    Written in C,
    Dep: libid3-3.8.3v5 libid3tag0 libopusfile0 – Suggested: libid3-tools

KDE

  • KID3

LINUX Command Line

  • id3:
  • id3edit: GIT = id3edit is a command line ID3v2 tag editor and debugger

Windows

  • MP3TAG: Freeware (Not free as in freedom), But great software nonetheless 😉

My brand new Sandisk clip sport plus MP3 player

Well, MP3 players are a thing of the past I know that much, but i do appreciate the compact size and dedicated hardware so I got this one, it came with 32GB of storage, Here are my findings

1- You need to heat up and remove the glass before you remove the frame as the frame has 4 screws under the glass !

2- The storage is a simple 32GB SD card, i took it out, Used DD to copy it to a 128GB SD card, put it back in, then used the format function on the device itself and it works !

That’s it, you can expand this to 128GB (Probably more, but i can’t guarantee that), but again, the firmware of the device is on the SD card, so you need to duplicate it before you put the new card in.

Downloading video from youtube

This might sound complicated, but youtube videos come in many shapes, many of them have either video only, or audio only !

the best way to get a full resolution video is to download then combine video and audio !

But before we go there, youtube throttles the speed you download videos at ! so youtube-dl needs patching, an alternative would be yt-dlp (See here)

The easier way to install would be

apt install yt-dlp

Now, if you insist on pip, you can do the following

apt install python3-pip

python3 -m pip install --force-reinstall https://github.com/yt-dlp/yt-dlp/archive/master.tar.gz

Now, let us try downloading a video/audio

youtube-dl -F https://www.youtube.com/watch?v=mUvrLxaSolc

The line above will show you a bunch of options and their IDs, what you need to do now is to download the ones you need with a command such as

youtube-dl -f 270 https://www.youtube.com/watch?v=mUvrLxaSolc

Now, to combine them (Audio and video) without re-encoding…

ffmpeg -i ao.webm -i vo.webm -c:v copy -c:a copy output.webm

But remember when you download,

Only VP8 or VP9 or AV1 video and Vorbis or Opus audio and WebVTT subtitles are supported for WebM.

If you have installed via pip3

/usr/local/bin/yt-dlp ...

Bluetooth Audio Transmitter from 3.5 Audio Jack

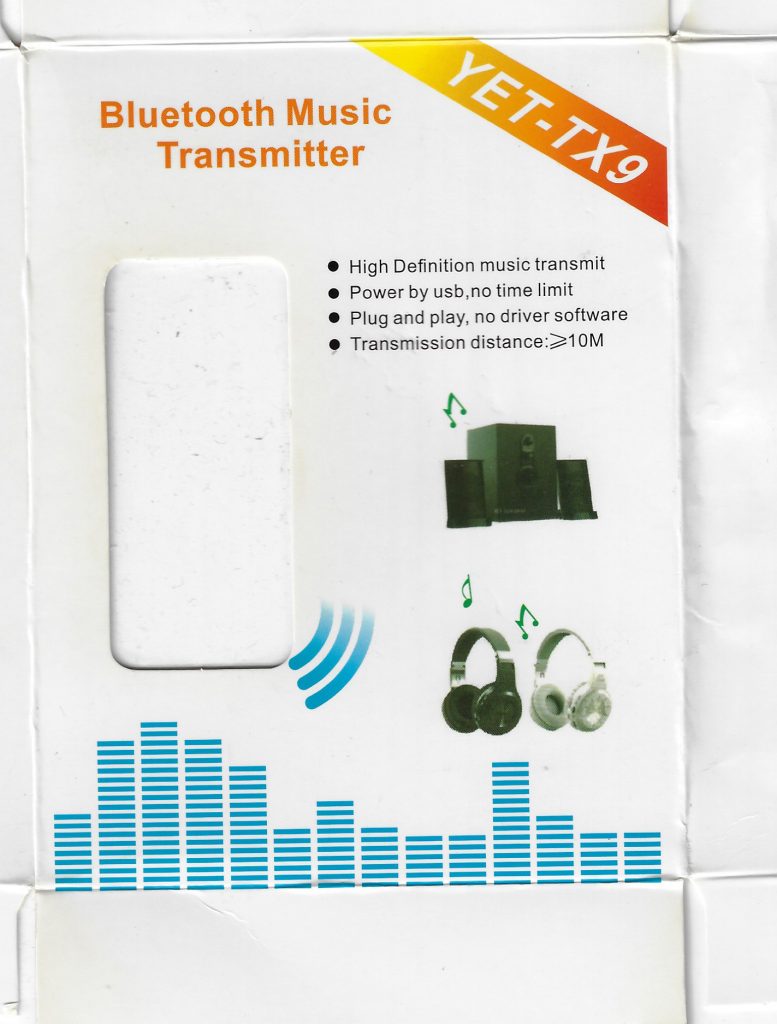
I have an android TV box with no Bluetooth, installing Bluetooth dongles to it does not work, So i got a nice little Bluetooth transmitter that receives audio from a regular headphones jack, and transmits it to a Bluetooth speaker ! the YET-TX9 (Amazon for $19 but i have my doubts it is the best option)

Please note: As an Amazon Associate I earn from qualifying purchases such as the one above.

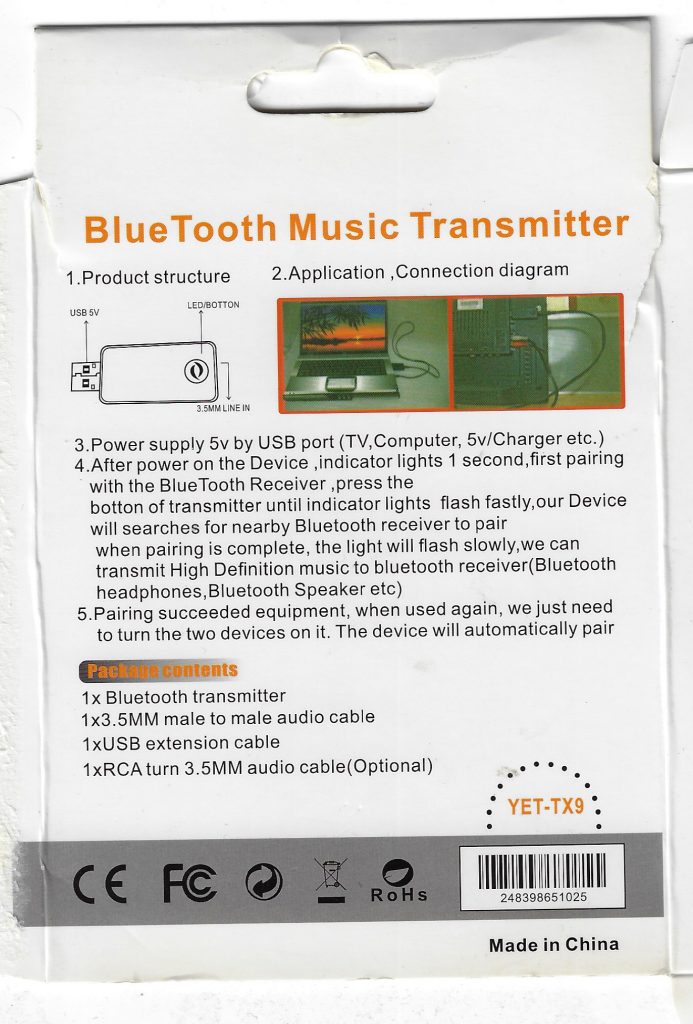
There is no user’s manual inside, the instructions are, as you can see, printed on the box.

Will come here and add the details as soon as i try it out

ZOIPER setup for a SIP account

This tutorial is relatively old, it was done for a friend, native SIP support on android phones has been removed by google, SIP VOIP applications such as ZOIPER, GSWave, ACR, groundwire (And it’s cousin “softphone by Acrobits”), A key for battery life with those apps seems to be push notifications support (You need to allow it)

Basically I need to give a friend of mine who is traveling a VOIP account of a special kind, So to make his experience as simple as possible, I took screenshots of the setup process, but generalized them enough for anyone who wants to setup a SIP account on zoiper.

Step1 : Install zoiper from the google play store, here is a link Install Zoiper , any other SIP CLIENT will do, but this one is the one i made the instructions for.

For iPhone, a nice SIP client seems to be SessionTalk which supports (Push notifications), this is important for your phone’s battery, otherwise it will drain in no time flat!

HINT: From here on, Just look at the pictures, no need to read all this text unless you need to know more things

Step 2: Open zoiper, then go to the config panel, then to accounts.

d1

Step 3: Click the “add account” to add an account to zoiper

d2

Step 4: When asked if you already have a VOIP account, Answer with YES

d3

Step 5: When asked if you want to configure manually, or select a provider, You would want to go with the manual configuration.

d4

Step 6: Now you need to set the account type, zoiper supports both SIP (Session Initiation protocol) which is more or less both a good standard and the defector standard in VOIP, this is the one we want, the other is called IAX (Inter Asterisk Exchange) which is specific to Asterisk, an open source VOIP system

d5

Step 7: Now, we need to give zoiper some settings to know where and how to connect, This data was given to you by your provider,

Account name: Any name you want, for example, the name of the provider, or how you use this account, you can call it my NY number, or TheTech, or any other name you want to use to identify this account

Host: The address of the server, this can be something like voip.example.com or example.com, any internet address whether FQDN or IP address should do.

Username: Self explanatory really
Password: Also self explanatory

d6

Extracting Audio from youtube files without loss of quality

To not get you confused with terminology, let’s create our own with the simple words we know.

For those who have been here before and want the lowdown to remind them of the commands, just scroll to the bottom of this post.

this bit of theory i am starting with is not needed for you to extract your audio, but simply to introduce you to what we are doing

The video file has 2 sub files, one for video and one for audio, and they are synchronized together so that the people’s lips movement in the video appear to be speaking what the audio file is playing.

If we do not want to lose any of the audio’s quality by decoding then re-encoding again, we will want to extract the “Inner audio file” without modifying it, and to put it into a separate file (container).

Separating the audio from the video is easy with a free tool called ffmpeg, and here are the exact instructions

1- Make sure ffmpeg is installed on your computer and is added to the system path, if not see the article (installing ffmpeg)
2- Download the youtube or any other video file to c:downloadvideo, assuming we have 2 tutorial files one is tutorial.flv and the other is tutorial.mp4, both were downloaded from youtube.com (if you don’t know how to download a youtube video, see this article).
3- open the command line (Command prompt can be opened from your start menu, look in accessories).
4- Enter the following command into your command prompt to change active directory to where you have your files, in our example we enter the following into the command prompt

cd c:downloadvideo

5-Then, for my first file, i will execute the command

ffmpeg -i tutorial.flv

You should now see, on your command prompt window, what sub files (streams) are inside your container file (the file you downloaded from youtube or anywhere else).

--------------------------------------------------------------
  Duration: 00:02:06.59, start: 0.000000, bitrate: 64 kb/s
    Stream #0.0: Video: flv, yuv420p, 320x240, 29.97 tbr, 1k tbn, 1k tbc
    Stream #0.1: Audio: mp3, 22050 Hz, mono, s16, 64 kb/s
--------------------------------------------------------------

if you don’t see the word mp3 like this example, don’t panic, just move on to step 7.

In our first example file, the audio stream turned out to be an MP3 stream as you can see below, if that was not the case and we had a different format (As i will explain next), we would have had different choices in extracting, but for this example, we have MP3, meaning we do not need to re-encode anything, just copy the stream from the container we downloaded into a new container that will be created

6- Extract the MP3 file without re-encoding and while keeping full quality like in the video

ffmpeg.exe -i tutorial.flv -acodec copy tutorial.mp3

But for some reason, copeying the OGG ogg vorbis from a webm file without reencoding did not work untill i added the -vn switch

ffmpeg -i Bir_G_zellik_Yap_Murat_Dalk_l.webm -vn -acodec copy test1.ogg

So, now i have the file tutorial.mp3 that simply has the same clarity as my video file. the -acodec copy parameter told ffmpeg to just copy into new file, and not to re-encode

7- If it does not say mp3 anywhere in your results, you have a different audio format. that we will deal with now.

so let us deal with our second file tutorial.mp4 that turned out not to have MP3 in it, but rather AAC.

So executing the command

ffmpeg.exe -i tutorial.mp4

Returned the result

--------------------------------------------------------------
Duration: 00:05:02.44, start: 0.000000, bitrate: 281 kb/s
  Stream #0.0(und): Audio: aac, 44100 Hz, mono, s16
  Stream #0.1(und): Video: h264, yuv420p, 320x240 [PAR 1:1 DAR 4:3], 25 tbr, 25 tbn, 50 tbc
--------------------------------------------------------------

In this case, we do NOT have the option that will allow us to get an MP3 without re-encoding, we can re-encode it into MP3 as i will show you in a bit, or we can extract and use an AAC audio file.

An AAC file is not at all bad, sometimes it is better than an MP3. Why ? The AAC file is a newer format and it will still play on many devices, on most computers, relatively new IPODs, Most modern mobile phones and many other MP3 players.

AAC file streams are mostly put into m4a containers, but can also be .m4b, .m4p, .m4v, .m4r, .3gp, .mp4, .aac. (OF YOUR CHOICE, the most common is m4a, but some older mobiles use 3GP)

So, let us first try to extract the AAC stream without re-encoding (next step we will re-encode to MP3 for those who want an MP3)

ffmpeg.exe -i tutorial.mp4 -acodec copy tutorial.m4a

Now, the device you want to use does not support AAC files, so what we can do is ask ffmpeg to convert it to MP3 for us

ffmpeg -i tutorial.mp4 tutorial.mp

—————————————————–

The Lowdown

1- Find out what streams exist

ffmpeg -i tutorial.mp4

2- Copy MP3 stream without re-encoding

ffmpeg.exe -i tutorial.mp4 -acodec copy tutorial.mp3

3- Copy AAC stream without re-encoding

ffmpeg.exe -i tutorial.mp4 -acodec copy tutorial.m4a

4- Re-encode audio to MP3 file fromat

ffmpeg -i tutorial.mp4 tutorial.mp3


To encode any file into a DVD compatible file (Best when used with DVD players that have a USB input or with USB TV)

ffmpeg -i 9.mp4 -threads 2 -filter:v "scale='if(gt(a,720/480),720,-1)':'if(gt(a,720/480),-1,480)',pad=w=720:h=480:x=(ow-iw)/2:y=(oh-ih)/2" -target pal-dvd 9.mpg

Sometimes, you might want to replace pal-dvd with ntsc-dvd