2.5MM audio jacks

2 pin connector TS (tip, sleeve)
3 pin connectors, TRS (tip, ring, sleeve)
4 pin connectors, TRRS (tip, ring, ring, sleeve)

TRRS

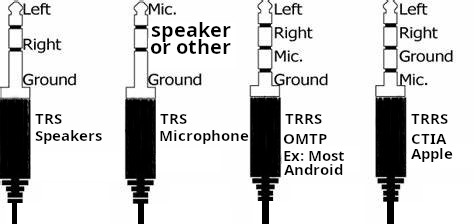
Two standards exist for TRRS (4 Pin)

CTIA, which you can think of as apple, and i will call it apple throughout the post to help you focus on what matters, and OMTP, Which is everything else which i will call Android from here on.

For android (And almost any non apple device), the sleeve (Pin closest to the wire) is the ground, and the ring right above it would be the microphone… the other ring and the tip are the two speakers, right and left, In apple’s setup, the ground and microphone are switched together !

TRS

In a 3 pin connector (TRS), When it is meant to carry microphone signal, the tip is the microphone signal, the sleeve is still the ground, and the ring may carry any other signal such as a single speaker channel.

Music players for android

When it comes to MP3 players, there is definitely no shortage, but finding a good one is a task

Here are the most popular one, each with it’s advantages and disadvantages

Retro Music Player

Open source: github
Available on google play and F-Droid
Elegant, plays music files and does not do much more
Appears to be written in Kotlin

Fossify Music Player

Open Source: Github
Available on Google Play and F-Droid
Elegant, plays music files and does not do much more
Appears to be written in Kotlin

Editing Music ID3 tags

id3 tags were meant to be a simple way to store metadata in MP3 files, slowly but steadily, things became a bit more complicated

Originally, ID3 tags were meta data near the end of a file, then ID3V2 came along, and meta tags were moved to the beginning (With an ID3V1 copy at the end added by most ID3 editors)

Album artwork is another complication, As it may be embedded in the file, An older method used to depend on keeping an image called “cover.jpg” in the folder where the file is stored.

You can also have “user-defined fields”, which can be helpful if you are developing a music player that has some novel ideas

ID3 tag information can be obtained from gnudb.org, MusicBrainz, Discogs, Amazon

Gnome

  • EasyTAG: GIT = tag editor for MP3, Ogg Vorbis files and more
    Written in C,
    Dep: libid3-3.8.3v5 libid3tag0 libopusfile0 – Suggested: libid3-tools

KDE

  • KID3

LINUX Command Line

  • id3:
  • id3edit: GIT = id3edit is a command line ID3v2 tag editor and debugger

Windows

  • MP3TAG: Freeware (Not free as in freedom), But great software nonetheless 😉

My brand new Sandisk clip sport plus MP3 player

Well, MP3 players are a thing of the past I know that much, but i do appreciate the compact size and dedicated hardware so I got this one, it came with 32GB of storage, Here are my findings

1- You need to heat up and remove the glass before you remove the frame as the frame has 4 screws under the glass !

2- The storage is a simple 32GB SD card, i took it out, Used DD to copy it to a 128GB SD card, put it back in, then used the format function on the device itself and it works !

That’s it, you can expand this to 128GB (Probably more, but i can’t guarantee that), but again, the firmware of the device is on the SD card, so you need to duplicate it before you put the new card in.

Sunshine and moonlight

VNC and RDP are great and all, and for so many purposes, they are the goto solution for remoting into a machine.

Now, another solution which is great (And much better if you have the bandwidth) is to broadcast your screen video and do all the work on the server rather than the client

The solution used to be nvidia’s game stream, which was abandoned by nvidia, the new solution based on nvidia would be the sunshine (Server) and moonlight client

The sunshine+moonlight duo work on almost every platform I need, Windows, Mac, Android, iOS, Even LG TVs running web OS… in short, it is a more universal solution. You can even create a virtual non existent monitor under linux and stream that to a different device !

So, let us start with the server (Sunshine)

Sunshine on debian

Installing sunshine on debian is very easy as a .deb installation file is provided, sunshine is not yet in the debian repositories, but if i understand the license correctly, it can be some time in the future

Now, go to the sunshine website, and download the deb file., in my case, I visit this webpage, and download the sunshine-debian-bookworm-amd64.deb file

Now, from the command prompt, su (to run as root), then cd to the directory where your deb file resides, then “sudo apt install ./sunshine-debian-bookworm-amd64.deb”, We should now have the server running and waiting to be opened in the web browser, Now, on the command line , type “sunshine”

Point a web browser to https://localhost:47990/, ignore the problem with self signed certificates, and set your username and password

Now, your debian computer is running a sunshine server, go to any other machine where you want to install the client (moonlight) from here , and connect to your server by its IP address.

You are done !

Sunshine on Windows

Download sunshine on windows from the latest release (As of today, you will fine it here)

Install it like you would any other application, once done, the official help page will show up (this)

once you click finish, a page at https://localhost:47990/welcome will open, asking you to create a password, create one, the default username is sunshine, but you can use whatever you want (In my case, it is my default RDP password)

you are done, you can now access the windows PC from any device with moonlight

Moonlight on Windows

you can download moonlight ether from github (Here) or from the official website (https://moonlight-stream.org/),

Creating images with AI (Programming)

So, I will start by dropping a few keywords here, and what they are about, that will probably help you start, I am compiling this as a guideline on where to start

  • VQGAN (Vector Quantized Generative Adversarial Network / neural network) : The software that generates the image
  • CLIP (Contrastive Language-Image Pre-training / neural network) : Software to influence a generated image based on input text (User prompt)
  • VQGAN+CLIP : Two neural network pieces of software that work in tandem.
  • CLIP-Guided-Diffusion: A technique for doing text-to-image synthesis cheaply using pre-trained CLIP and diffusion models.
  • Google colab notebook: A tool made by google where you can run python code and utilize google’s GPUs, both paid and free exist

Downloading video from youtube

This might sound complicated, but youtube videos come in many shapes, many of them have either video only, or audio only !

the best way to get a full resolution video is to download then combine video and audio !

But before we go there, youtube throttles the speed you download videos at ! so youtube-dl needs patching, an alternative would be yt-dlp (See here)

The easier way to install would be

apt install yt-dlp

Now, if you insist on pip, you can do the following

apt install python3-pip

python3 -m pip install --force-reinstall https://github.com/yt-dlp/yt-dlp/archive/master.tar.gz

Now, let us try downloading a video/audio

youtube-dl -F https://www.youtube.com/watch?v=mUvrLxaSolc

The line above will show you a bunch of options and their IDs, what you need to do now is to download the ones you need with a command such as

youtube-dl -f 270 https://www.youtube.com/watch?v=mUvrLxaSolc

Now, to combine them (Audio and video) without re-encoding…

ffmpeg -i ao.webm -i vo.webm -c:v copy -c:a copy output.webm

But remember when you download,

Only VP8 or VP9 or AV1 video and Vorbis or Opus audio and WebVTT subtitles are supported for WebM.

If you have installed via pip3

/usr/local/bin/yt-dlp ...

ffmpeg cheat sheet

Combine video and audio (yt-dlp)

First of all, after using yt-dlp to download 2 webm files for a video, you can combine them without reencoding using the following command (See here), Just make sure both files are VP8 or VP9

ffmpeg -i ao.webm -i vo.webm -c:v copy -c:a copy output.webm

Extract segment from video

To extract the section from the file resulting from the first command above

1- From second x, and duration in seconds

ffmpeg -ss 285 -i g_in.mkv -t 5475 -map 0 -c copy g_out.mkv

2- From second x to second y

ffmpeg -copyts -ss 4633 -i g_in.mkv -to 5470 -map 0 -c copy g_p2.mkv

Convert file

Converting a file you have downloaded using 1 or any other file into MP4 (H264), since some windows computers will not play a webm file !

ffmpeg -i source264.mp4 -c:v libx265 -crf 28 -preset fast -c:a aac -b:a 128k  -filter:v fps=25 out265.mp4

If you want to cut a part of the video, without re-encoding it

ffmpeg -i input.mp4 -vcodec copy -acodec copy -ss 00:01:00.000 -t 00:00:02.000 output.mp4

nVidia (GPU) : Convert H264/H265

Nvidia graphics card to convert H265 (MKV) to H264 MP4, Using nvidia hardware encoder to encode video into H264 or H265 !

To checks whether hardware encoders are available or not, run the command

ffmpeg -encoders | findstr /ic:"NVIDIA"

If the following two lines are in the command, you can use the nVidia encoder, the first codec is H264, and the second is for H265 (HEVC)

V....D h264_nvenc           NVIDIA NVENC H.264 encoder (codec h264)
V....D hevc_nvenc           NVIDIA NVENC hevc encoder (codec hevc)

ffmpeg.exe -vsync 0 -hwaccel cuda -i <input_file> -map 0  -c:a copy -c:v h264_nvenc -pix_fmt yuv420p -preset hq <output_file>

-vsync : Synchronize video audio and metadata using the video timestamp
-hwaccel cuda : Use nVidia’s cuda for hardware accelleration

Example, Convert mkv to mp4 (Tested OK)

Now, with the above out of the way, the following command should encode your 1080P mkv H265 video to H264 ! all within GPU, so this re-encodes an nVidia compatible format to another nVidia compatible format, on my 1650 card, it was encoding at 12x. this provides better compatibility, if smaller file size and quality are what you seek, then you should do it the other way around

ffmpeg -i "1080p.mkv" -c:v h264_nvenc -pix_fmt yuv420p -minrate 500k -maxrate 1000k -c:a mp3 -b:a 128k "1080p.mp4"

The other way around

ffmpeg -i "1080p.mp4" -c:v hevc_nvenc -pix_fmt yuv420p -minrate 200k -maxrate 1000k -c:a aac -b:a 128k "1080p.mkv"

NOTE: The above does everything within the GPU, if for example you wanted the decoding on CPU, that will make things much slower because the decoded video (Huge) will still need to be copied to the GPU,

nVidia : DVD to H265

Encoding H265 with my entry level GPU (1650) is around five to fifteen times faster than with CPU (6 core, 12 thread i7-4930K), CPU was running at around 50% load through the encoding

Now one very common task people want to execute is converting their old, bulky DVD collection to H265 (Or H264 if they value compatibility over size and clarity), DVD files are usually on a DVD in the Video_TS folder, and the AudioTS folder, So this will create a few cases

Case 1: Audio_ts folder is empty, Video TS folder has files that you know the order they should be displayed in, the objective is to put them all in one video file (Assuming MKV but the container is your choice), in this case, I usually start by converting all the videos to H265, then combine them, here, most of my videos are interlaced (that will be dealt with with yadif), and sometimes, they are files of different resolutions, so I will unify their size

ffmpeg -i "v1.VOB" -c:v hevc_nvenc -c:a aac -b:a 256k -vf yadif,scale=1920:1080 -x265-params "crf=22:min-keyint=25:keyint=50" -preset slow "d1.mkv"

Now, create a list of the files

(for %i in (*.mkv) do @echo file '%i') > mylist.txt

And concatenate the videos

ffmpeg -f concat -i mylist.txt -c copy output.mkv
Now, to batch process a folder on the command line... in this example i am lowering the resolution of files to FHD from 4K
for /f "tokens=1 delims=." %a in ('dir /B *.mp4') do ffmpeg -i "%a.mp4" "%a.1080.mp4"

And here is one meant to extract the audio from all the MP4 files

Windows

for /f "tokens=1 delims=." %a in ('dir /B *.mp4') do ffmpeg -i "%a.mp4" -vn -acodec copy "%a.aac"

Linux

for i in *.mp4; do ffmpeg -i "$i" -vn -acodec copy "${i%.*}.aac"; done

Split audio file

ffmpeg -i 2024-07-27_20_38_2.m4a -f segment -segment_time 1740 output_%03d.m4a

Converting MKV to MP4

Here is a case where my MKV file contains the audio in AAC, and the video in H264, As you slide the slider in VLC media player, it tells you what the section is about, i should be able to copy the streams exactly as they are, but I was concerned that the “Slider Hints” would disappear, hence I split it into audio and video without re-encoding, checked that the hints are still there in the video, then combined them into an MP4, also without encoding, the reason I wanted the container to be MP4 is that sometimes I access my network files in a browser, and browsers seem more comfortable playing MP4 files than MKV

* ffmpeg -i My_Dinner_With_Andre_1981.mkv -vn -acodec copy ao.aac
* ffmpeg -i My_Dinner_With_Andre_1981.mkv -an -c:v copy vo.mp4
* ffmpeg -i ao.aac -i vo.mp4 -c:v copy -c:a copy My_Dinner_With_Andre_1981.mp4
Making a video smaller

A couple of hours ago, i received a video that is 50 frames per second, and compressed in H264, the video was 58MB, and she wanted it less than 15 to send it via email, the video was 1:45 long, so i re-encoded it in H-265 but she had a problem playing it (No codec), so i decided to re-encode it with VP9 (webm).

to arrive at a number less than 10, i needed to be encoding at around 1 MegaBIT per second, now, to do this, I made a 2pass encoding with ffmpeg as follows

ffmpeg -i source.mp4 -c:v libvpx-vp9 -b:v 1M -filter:v fps=25 -pass 1 -an -f null /dev/null && \
ffmpeg -i source.mp4 -c:v libvpx-vp9 -b:v 1M -filter:v fps=25 -pass 2 -c:a libopus out.webm

The first pass collects statistics about the source video in a text log file, the second pass encodes the new video, from the options above, i have taken the frame rate to 25fps (from 50), and instead of defining the crf, i simply told ffmpeg what the biterate I need is, which is 1Mbit per second (Every 8 seconds, 1 MBYTE)

The previous one, H-265 was done with the command

ffmpeg -i source264.mp4 -c:v libx265 -crf 28 -preset fast -c:a aac -b:a 128k  -filter:v fps=25 out265.mp4

the H265 was smaller due to the crf factor used, as well as the lower frame rate

webP is the new PNG

Superior in both Lossless compression, and Lossy compression, webp is the new image format by google

Already supported by all web browsers *(that i have tested it with), webP is indeed a promising format, so let us get to compressing our images

I have a big bunch of bitmaps that my scanner spits out (To avoid lossy jpeg compression the scanner’s driver produces), and i need them converted to lossless webp to save space (the first image I compressed went from 552MB bitmap to 183), that is 33% of the original size

So, under linux, this is how i would convert all BMPs into webp images, I think it is exectly the same on windows

on the command line, the command for compressing one image looks like

cwebp -lossless 00.bmp -o 00.webp

Now, the next step is to run them in a batch, copy the following text into a file and name it with the extension