Mobile Development

This is just a summary of the tools you may or may not use for mobile development

Cross Platform

  • Dart-Flutter
  • React Native
  • Kotlin Multiplatform (& compose-multiplatform ;))
  • Ionic
  • .NET MAUI, (Successor to Xamarin.Forms), develop in C#
  • NativeScript: Build mobile apps with Angular, Vue.js, etc !

Android

  • Android Studio
    Kotlin / Java
  • Jetpack Compose : composable functions – define your app’s UI programmatically

iOS

  • Xcode

My flutter notes

This is an unstable post, I add comments here, then move them to their final destination on a separate post, posts are listed on the Dart/Flutter page, so it is completely normal for this post to be empty most of the time !

The reason I am interested in flutter is that it may just be the best option to accompany my RUST programs and fit them with relatively efficient front ends ! again, potentially the best fit FOR ME AND MY RUST PROJECT IDEAS

LineageOS for my J500H phone

This phone is so old and low on storage space, that if it is left to connect to the internet, the storage fills up completely before you get the chance to disable updates !

I have moved to external storage before, but as you might expect, this would have been a great solution if i had slightly more space on the device itself (Original post here)

For development purposes, I would like this phone to have as low an android version as possible, and the lowest android version of LiniageOS itself is 6 (Marshmallow)

CyanogenMod, the name of LiniageOS before Nougat, but it overlaps with LiniageOS at Android version 6, although Android 5 on the phone would have been more useful for my development endeavors, I decided to go with Android 6 anyways. Which happens to be LiniageOS 13.

The best file managers for Android

There is no shortage of file managers for android, both free and paid

The popular Paid file managers are

  • MiXplorer = Paid, no trial, plugins to add functionality
  • Solid Explorer = 14 Day trial, during trial, you get ads (Root explorer, archiver, Chromecast, File categorization) + Local + FTP, LAN, sFTP, WebDav, NextCloud, etc…..
  • File Commander = 7 Day Trial, during trial there are ads, FTP, LAN, cloud providers, etc…

Free and open source

  • Material Files = Simple file manager, but well done in terms of design and good android development practices, Open source mostly written in kotlin (Github =>)
  • Amaze File Manager = Simple material design file manager, written in both Java and Kotlin (Github =>)
  • NextCloud Android client = Works with the self hosted Next Cloud (But so do unofficial managers) (Github =>)

Free but not open source

  • File Manager by Xiaomi = Has network options (LAN, FTP)
  • Google Files = Basic, supports Google Drive and OneDrive, google drive launches the drive app

2.5MM audio jacks

2 pin connector TS (tip, sleeve)
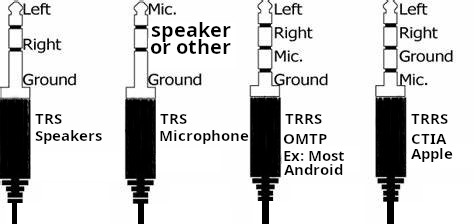
3 pin connectors, TRS (tip, ring, sleeve)
4 pin connectors, TRRS (tip, ring, ring, sleeve)

TRRS

Two standards exist for TRRS (4 Pin)

CTIA, which you can think of as apple, and i will call it apple throughout the post to help you focus on what matters, and OMTP, Which is everything else which i will call Android from here on.

For android (And almost any non apple device), the sleeve (Pin closest to the wire) is the ground, and the ring right above it would be the microphone… the other ring and the tip are the two speakers, right and left, In apple’s setup, the ground and microphone are switched together !

TRS

In a 3 pin connector (TRS), When it is meant to carry microphone signal, the tip is the microphone signal, the sleeve is still the ground, and the ring may carry any other signal such as a single speaker channel.

Music players for android

When it comes to MP3 players, there is definitely no shortage, but finding a good one is a task

Here are the most popular one, each with it’s advantages and disadvantages

Retro Music Player

Open source: github
Available on google play and F-Droid
Elegant, plays music files and does not do much more
Appears to be written in Kotlin

Fossify Music Player

Open Source: Github
Available on Google Play and F-Droid
Elegant, plays music files and does not do much more
Appears to be written in Kotlin

Wireless android studio

I run windows in KVM, and the QEMU android Emulator that ships with Android studio crashes all the time, so the obvious solution, with all those android devices I have is to connect a phone to android studio, It is faster and spares me the hassle of finding out why nested virtualization is so terrible

But having a phone connected via USB is not optimal, as i have to pick it up every time i want to run my under development software on it !

The answer seems to be in the

1- install Android WiFi ADB : A plugin easy to install in Android studio

2- A phone with Android 11 and above

So let us do this step by step

  1. Download SDK platform-tools and install it (Copy it somewhere and add that to your system path)
  2. Enable developer options on the phone (Keep tapping build number)
  3. From developer options, Enable wireless debugging
  4. Select Pair device with pairing code. Take note of the pairing code, IP address, and port number displayed on the device (see the above image).
  5. Open the command prompt and run the command adb pair ipaddr:port
    adb pair 192.168.7.101:45353
    Enter pairing code: xxxxxx
    daemon not running; starting now at tcp:5037
    daemon started successfully
    Successfully paired to 192.168.7.101:45353 [guid=adb-RF8M4xxxxxxx-xxxxxxx]
  6. Now, to have it appear as a device in android studio… Go to wireless debugging and notice the port number, then using that IP and port, use the following command
    adb connect 192.168.7.101:35127
  7. Recommended: Install the “Android WiFI ADB” plugin in android studio

Note: The Pairing port is not the same as the connection port ! so pay attention to that

Sunshine and moonlight

VNC and RDP are great and all, and for so many purposes, they are the goto solution for remoting into a machine.

Now, another solution which is great (And much better if you have the bandwidth) is to broadcast your screen video and do all the work on the server rather than the client

The solution used to be nvidia’s game stream, which was abandoned by nvidia, the new solution based on nvidia would be the sunshine (Server) and moonlight client

The sunshine+moonlight duo work on almost every platform I need, Windows, Mac, Android, iOS, Even LG TVs running web OS… in short, it is a more universal solution. You can even create a virtual non existent monitor under linux and stream that to a different device !

So, let us start with the server (Sunshine)

Sunshine on debian

Installing sunshine on debian is very easy as a .deb installation file is provided, sunshine is not yet in the debian repositories, but if i understand the license correctly, it can be some time in the future

Now, go to the sunshine website, and download the deb file., in my case, I visit this webpage, and download the sunshine-debian-bookworm-amd64.deb file

Now, from the command prompt, su (to run as root), then cd to the directory where your deb file resides, then “sudo apt install ./sunshine-debian-bookworm-amd64.deb”, We should now have the server running and waiting to be opened in the web browser, Now, on the command line , type “sunshine”

Point a web browser to https://localhost:47990/, ignore the problem with self signed certificates, and set your username and password

Now, your debian computer is running a sunshine server, go to any other machine where you want to install the client (moonlight) from here , and connect to your server by its IP address.

You are done !

Sunshine on Windows

Download sunshine on windows from the latest release (As of today, you will fine it here)

Install it like you would any other application, once done, the official help page will show up (this)

once you click finish, a page at https://localhost:47990/welcome will open, asking you to create a password, create one, the default username is sunshine, but you can use whatever you want (In my case, it is my default RDP password)

you are done, you can now access the windows PC from any device with moonlight

Moonlight on Windows

you can download moonlight ether from github (Here) or from the official website (https://moonlight-stream.org/),
Pixel 6 stuff

To begin with, the links here are Amazon associate links, what this means is that buying things using those links will result in a commission for me ! to recap. “As an Amazon Associate I earn from qualifying purchases.”

What I am trying to do is to create a cover that allows me to switch between USB OTG devices easily at the workshop, so i created a 3D printed connector that fits with the following parts, the STL for that model will be provided once I use it and make sure it works, In addition to the pixel 6 pro, have made the 3D printed connector holder for the Samsung Galaxy S10, S10+, Ulefone Power 5, Ulefone Armor 3,

The external camera also has a 3D printed case design which I will also share… the screen protector has nothing to do with the project, but i am getting it anyways because it is nice if you have screen protection at the workshop, the screen protection uses UV curing adhesive ! which may or may not ruin your oleophobic coating on your screen (remains to be seen)

Things that I am getting

Screen protector Here said to work best with the fingerprint sensor (Once you use the penny trick), and tough enough to stay put with those curved edges !

2 phone covers here (Shaded Spurce (Green) and Slate (Grey))

4 of USB C Magnetic Adapter here, 2 Elbow and 2 Flat Elbow

Things that I don’t want to buy but are worth mentioning

Google’s Air Buds (Pixel) are on sale for $99 (here) and the pro are discounted at $199 (Here), I personally like my ugreen with qualcom chipset, So i don’t think i will get the google ones any time soon, but they are here for ref.

Enable adoptable storage for the J5 J500H (3G)

Allowing Adoptable storage on the Samsung J5 20165 – J500H

There are a few tricks for this particular phone
1- We need to replace the recovery system with TWRP

Enable phone developer mode, then USB debugging and OEM override (Disable protection)
Download ODEN
Download the TWRP .TAR file for your device, for the Samsung J5 2016 (J500H), you should find i here
https://twrp.me/samsung/j53gxx.html

reboot your system into bootloader mode (Vol down, Home and power at the same time for 3 seconds to start the phone)

Open ODEN, chose the tar file for AP, and upload the TWRP

Now, don’t let the phone reboot into the system or it will overwrite the bootloader with the original one, instead
once the phone starts rebooting, hit, Volume UP and home button and power at the same time, and TWRP will patch the
system once it opens in recovery mode so that it won’t overwrite the new TWRP

Reboot system, and boot with Power, Home, And volume down button for bootloader change

From this point on, you can enter into TWRP with the Home, Vol UP and Power button combination at boot time

Now download the patch to enable adoptable storage and store it to the SD card (adoptable_storage_enabler_ashyx) from here https://forum.xda-developers.com/galaxy-tab-a/how-to/patch-adoptable-storage-enabler-t3507387

Start the recovery mode (TWRP mode)

Hit install and chose the file you have downloaded

That’s all you need

Now, next thing you will need to do is to format the SD card using the guide here

http://www.tech-g.com/2019/12/01/storing-whatsapp-video-and-photo-to-sd-card-with-no-compromise/