Tunneling Firefox traffic through SSH – Putty

I will here assume you already have a remote Linux machine that you can SSH into with putty, the instructions are simple from this point on

Putty Setup

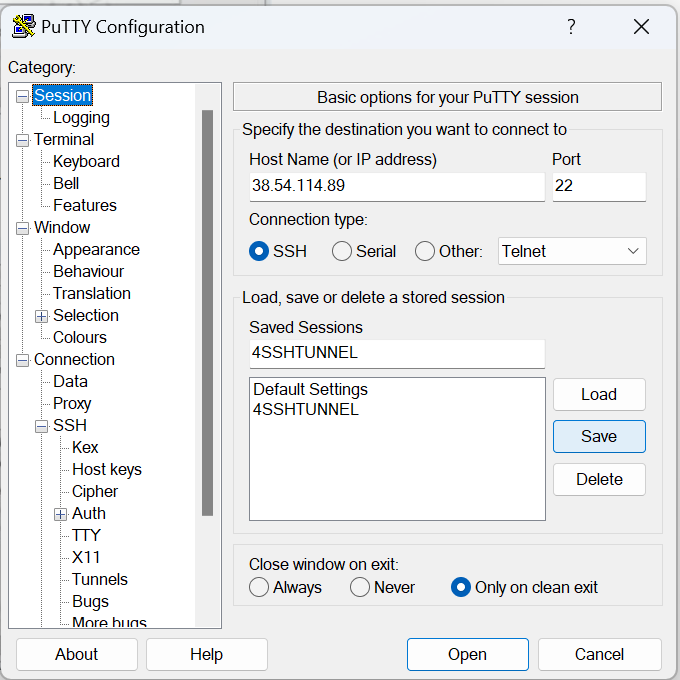
1- Basic putty settings, assuming you have already downloaded putty from chiark.greenend.org.uk, now open putty, enter the IP of the server you wish to tunnel through, and save it with a name, the steps are…
– Open putty,
– enter the IP of your remote machine
– give it a name of your choice
– save (You don’t need to save now, you will save again in a bit, but you can do it anyway)

2- Go to Connection and expand it, then expand SSH, then select Tunnels, this will show a dialogue such as the below, fill in the data as follows

  • A Source port between 1025-65536 (of your choice), i chose 8081 but you can chose any other in that range
  • Check Dynamic and Auto, the click Add

3- From the menu on the left, go back to Session, and click the save button again (So that the new tunnel settings are saved for next time)

4- You are almost done, Now double click the saved session name or select it and hit open, the remote machine should now prompt you to enter a username and a password, once you enter those, you have a tunnel ready on your localhost (127.0.0.1) on port 8081, next we will setup Firefox to use that tunnel

Firefox setup

1- Go to firefox settings (Click the accordion menu to the right, and chose settings), once open, scroll down under general, until you find the Network Settings section, click the settings button in that section

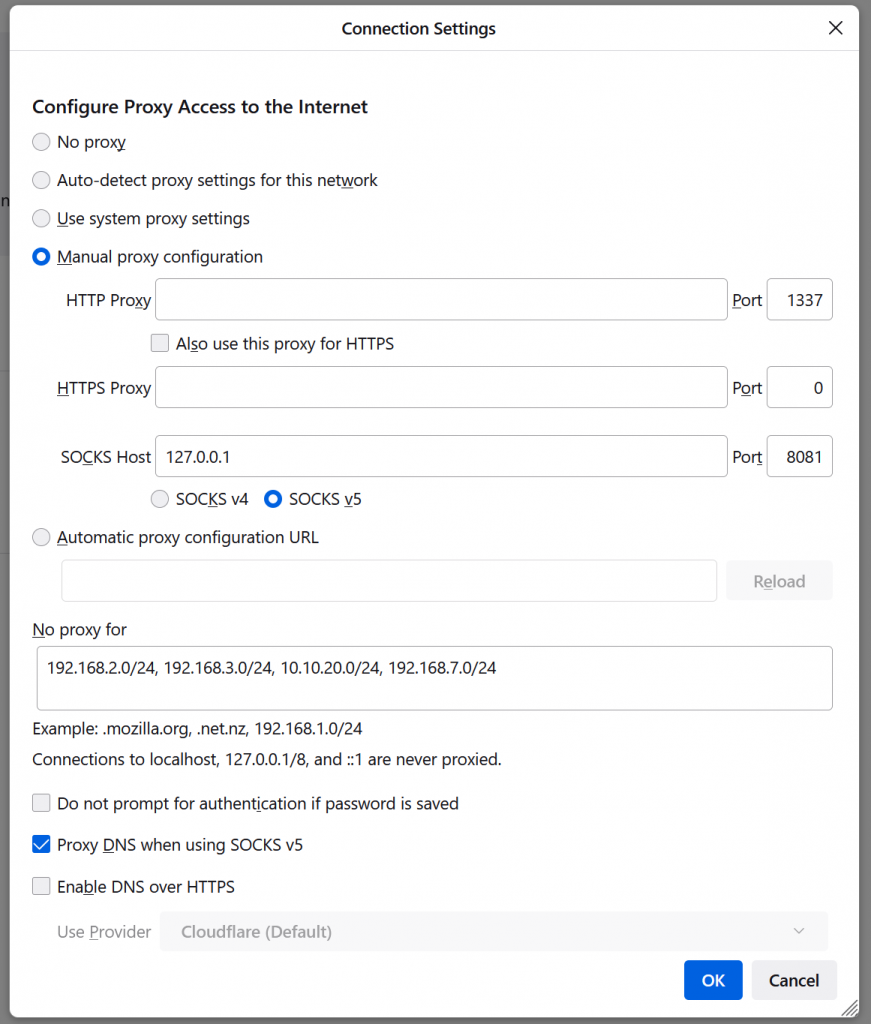
Clicking settings above will show the following popup dialogue, setup your system as follows

  • Manual Proxy Configuration
  • SOCKS Host enter 127.0.0.1 and in the port area of that the port we chose in putty (In my case, 8081)
  • Optional – Add the IP address ranges of the IPs that you do not want to have tunneled through the remote machine
  • For more privacy, and sometimes functionality (When access is blocked from abroad), make sure you tunnel your DNS queries as well (See checkbox below)

Now, to verify that you are conencted to the remote machine, google the following

what is my ip

and google should tell you what your IP address is, at this stage, it should be the same as the remote machine’s IP (Not yours)

Mounting unclean NTFS windows drive in Linux

Whenever i get the following message

mount /dev/sdd1 /hds/sgt2tb
The disk contains an unclean file system (0, 0).
Metadata kept in Windows cache, refused to mount.
Falling back to read-only mount because the NTFS partition is in an
unsafe state. Please resume and shutdown Windows fully (no hibernation
or fast restarting.)
Could not mount read-write, trying read-only

The command

ntfsfix /dev/sdd1

resolves the issue, and produces the following message

Mounting volume... The disk contains an unclean file system (0, 0).
Metadata kept in Windows cache, refused to mount.
FAILED
Attempting to correct errors...
Processing $MFT and $MFTMirr...
Reading $MFT... OK
Reading $MFTMirr... OK
Comparing $MFTMirr to $MFT... OK
Processing of $MFT and $MFTMirr completed successfully.
Setting required flags on partition... OK
Going to empty the journal ($LogFile)... OK
Checking the alternate boot sector... OK
NTFS volume version is 3.1.
NTFS partition /dev/sdd1 was processed successfully

The same mount command you see here will now work flawlessly

mount /dev/sdd1 /hds/sgt2tb

I am still unsure what process from the mentioned above is responsible, as this oftentimes pops up on drives that were never system drives, so there is no hibernation file problem

Mounting a remote Linux file system as a Windows drive

You can do this in many ways, the most popular of which is SAMBA, but this is not the software we are using, here we are using SSHFS

The software this post is about is SSHFS, if you are reading this, you probably know what SSH is (Secure shell), and FS stands for File System

Ironically, you will only need to have SFTP and not SSH with shell access, so here is the first surprise, Now, to continue with this tutorial, you might want to visit the page I have posted here to create that user and give him/her access to the directory to be mounted, don’t worry, there is a link back here at the bottom of that page !

So, now that you have created that user account on the remote system, let’s get down to business

You will need 2 peices of software, or 3 if you would like to use private/public key authentication

For the following software, look on their websites for the latest installers for your version of Windows (Usually you are looking for the msi of the 64bit version of windows)

1- WinFsp, short for Windows File System Proxy, What this basically does is enabled the developer of SSHFS-Win to make it look like a windows drive, not some separate SFTP application where you have to move the files manually, when you present it as a drive, you can modify files directly on it, which is the main advantage, and it will do the work in the background, it is a driver that presents itself on/to windows as a disk, while cheating the disk contents from another application, the github page for it is at https://github.com/winfsp/winfsp, or to save you time, Just go directly to the download page here https://github.com/winfsp/winfsp/releases/tag/v1.11 , When presented with optional components, if you are not a developer, you will only ever need the Core package, which is the installer’s default

Once WinFsp is installed, we are done with the part that allows us to display file systems that are not really filesystems, the next step is to have something feed that with data from an actual filesystem somewhere else ! via SFTP, and that software would be

2- SSHFS-Win, which is the system that sits in the middle, between the SFTP server, and WinFsp which is an illusion of a hard drive on your windows machine ! it’s home on github is at https://github.com/winfsp/sshfs-win, To get the latest from this one, go here https://github.com/winfsp/sshfs-win/releases and look for the one that says latest (Not pre-release), download and install it

There is no software to install on the remote side, as most Linux systems already have the functionality ! and you have already setup a user in the previous post that I pointed you to a minute ago, So let us mount !

Now, you can (But don’t do it just yet) open file explorer in Windows, right click “This PC”, and click on Map Network Drive, A dialogue appears, enter your connection string, which should be something like

\\sshfs\username@serverhostname\

You should then be prompted with a password dialogue box, you enter the SFTP password, and you should now be all set, but why are we not doing this right now ? we are not doing this because when you create files in that drive, they will remotely have rwx permissions for owner, and no permissions for group or others, wo work around this, you need to pass the following arguments to the mount

webdev@10.10.20.41:/

create_file_umask=0000,create_dir_umask=0000,umask=0000,idmap=user,StrictHostKeyChecking=no

which is only available via command line and does not survive reboots, a better alternative is to use sshfs-win-manager, which seamlessly mounts those remote file systems using SFTP , the long and short of it is that it just works


Another program that has a different set of permission issues (I can write files, but can’t write to them again even though i own the files on the remote system and the permissions should allow) is SiriKali (https://github.com/mhogomchungu/sirikali), you should be able to find the line to download for your platform here (https://mhogomchungu.github.io/sirikali/)

SiriKali also allows you to use other types of authentication which are beyond the scope of this post

So in SiriKali, you need to fill the above information, luckily that information is loaded by default.

Remember to select the checkboxes you need,
Static IP on Hyper-v (Debian Guests)

One problem i face when developing using Hyper-v is that I need static addresses, and the default switch keeps changing the ip range

The simplest solution to this is to create a new switch of type internal ! this only connects the virtual machines to each other (Static IP etc…), and can not access the internet

Right after creating an INTERNAL switch in the switch manager, you go to “Manage network adapter settings” on the host computer, and assign an IP such as 10.10.20.1 to the adapter and a subnet of 255.255.255.0, no gateway, and nothing but those IPs.

Once that is done, you add a second adapter to all the virtual machines, and in the /etc/network/interfaces file, you leave eth0 the way it was (For internet) and add a metric 10 under the last line for eth0, then add the following stanza for the new adapter (Assuming eth1), eth 1 has a higher cost in it’s metric, so unless the remote is on the eth1 subnet, it will go through the eth0

auto eth1
iface eth1 inet static
 address 10.10.20.41/24
 metric 100

And you are done, those virtual machines can address each other with their 10.10.20.x addresses, and access the outside world via the other network interface.

Video Editing for Debian 11

On linux, when i needed to edit a video I usually go to Kdenlive, I used to think it is THE linux alternative to Adobe Premier Pro, until yesterday, when a friend recommended I try out OpenShot

I am a Gnome user, Kdenlive was designed for KDE, I have always run it in gnome (Unity) and it worked fine, but today, I am feeling adventurous and up for trying OpenShot, openshot too is pyQt which is a bummer, but hey, this is not why we doing this

Reminder
KDE is based on Qt and Gnome is based on GTK. both applications here are meant for KDE, and I don’t really want to install KDE on my machine

This post here is where I will leave my impressions so hang tight.

redis for Laravel on Debian

If you are like me, running only your own projects on a server, you might want to skip authentication

the changes I generally make to the file /etc/redis/redis.conf are

1- At the very beginning, limit the RAM redis can use with the line

maxmemory 2gb

2- Change the supervisor to systemd by modifying the line

supervised no

to

supervised systemd

Now, to test the new config, from the command line, run the following commands

systemctl restart redis-server
redis-cli
ping
config get maxmemory
quit

You have just configured redis and tested your new settings.

Nested virtualization in KVM

The reason I am enabling this in my virtual machine is to develop with android studio under windows or Linux in a dedicated development machine (Let us call it an android development virtual machine), you will need to enable nested virtualization for the virtual android phone that comes with Android studio, there are many occasions where you need nested virtualization, so let us see what we need to do.

1- Check if our system allows nested virtualization with the following line

cat /sys/module/kvm_intel/parameters/nested 

If this returns a Y or a 1, then we are good to go to the next step, if not, then execute the following to enable the feature on the host system

echo 'options kvm_intel nested=1' >> /etc/modprobe.d/qemu-system-x86.conf 

Now, with that out of the way, we can move to the next step

2- Enable nested virtualization in the config of the virtual machine, either with virsh edit or edit the file manually and reload it, whatever you are used to doing should work

virsh edit androiddev

Now, specify either host-model OR host-passthrough, host model is more compatible when moving the virtual machine to a new CPU, while host-passthrough will deliver absolutly all CPU features to the guest os, but is very unfriendly to moving the machine to a different KVM host

<cpu mode='host-model'> 

Giving SFTP access to a user for a certain directory !

In this mini tutorial, I will be adding the user kareem to the system, and allow kareem to sftp into a web directory where he can post his web design work, as usual, the steps first, then whatever explanations !

There are two ways to do this, one to add one user, the other to add a group of users, you can either pick one, or do both !

The part in common between both solutions

apt-get install openssh-server
adduser kareem
Then enter a new password twice for kareem

The interesting thing about this sftp user business is that the directory we will specify as the root for the user kareem has to be owned by root ! so go ahead and create the directory /var/www/html/usr/kareem, then execute the following commands

chown root:root /var/www/html/usr
chmod 755 /var/www/html/usr

chown kareem:kareem /var/www/html/usr/kareem

Now, the user kareem owns a directory within his root directory that he can write to, and can not write outside that directory since he does not have the OS permissions, Now, let us add kareem to the list of people who have sftp access but not ssh access.

Edit /etc/ssh/sshd_config and append the following to the document

Match User kareem
ForceCommand internal-sftp
PasswordAuthentication yes
ChrootDirectory /var/www/html/usr
PermitTunnel no
AllowAgentForwarding no
AllowTcpForwarding no
X11Forwarding no

Now, restart the service by executing the following command

systemctl restart ssh

You are done, try connecting with something like winSCP

Besides winSCP, you can also simply mount the linux filesystem where you have permissions on your windows machine, here are the complete instructions on how to do that https://www.qworqs.com/2022/10/09/mounting-a-remote-linux-file-system-as-a-windows-drive/

Resume bad blocks where it was stopped

The answer to this should be simple, I initiated the test with

badblocks -nsv /dev/sdb

, first, interrupt bad blocks with ctrl+c, the output should be

Checking for bad blocks in non-destructive read-write mode
From block 0 to 1953514583
Checking for bad blocks (non-destructive read-write test)
Testing with random pattern:   0.92% done, 49:38 elapsed. (0/0/0 errors)
 21.32% done, 18:49:24 elapsed. (0/0/0 errors)

Interrupted at block 416437376

Interrupt caught, cleaning up

Okay, so we know what blocks it was supposed to check (1 through 1953514583), and where it was interrupted (416437376)

So i will ask it to resume testing from where it finished (-1), up to the end

badblocks -nsv /dev/sdb 1953514583 416437375

n = Non destructive
s = Show progress
v = tell us about what you find !

The new run should tell you the percentage correctly, but the time counter will be reset to zero, as it is only counting how long this run has been running for

One thing to note is that bad blocks can be used to instruct the filesystem to avoid the bad blocks, but it also allows the disk’s firmware to substitute bad blocks with spare blocks, so that the disk works again with no intervention from your end !

So for my 2TB hard drive…

416437375 = 21% (13 hours)
619014719 = 31.6% (+23:22)
627995199 = 32.15% (+1:04)
667782398 = 34.18% (+4:46)
715469885 = 36.62% (+5:44)
827834875 = 42.38%

While running the tests, you might want to keep an eye on the hard drive temperature with a command like

hddtemp /dev/sdb

To create a log file of the bad blocks, every run should have it’s own file !

badblocks -nsv -o /root/badblocks3.txt /dev/sdb 1953514583 627995198

The concatenation of those files you are creating is very useful in creating a file system if you ever decide to format the drive later !, but the recommended way is using badblocks with the other disk tools directly

while the test is running, you will see 3 numbers that correspond to readerror/writeerror/corruptionerror