reverting tp-link tl-mr3220 V2 to stock firmware the easy way

If you are on openwrt and want to revert back to factory firmware, you need to do the following easy steps

Download the file from the tp-link website, this should be straight forward, you go to the website, search for your router by model, on the firmware download page, select the version of your router and download the file

If it is a zip file, extract it, we are looking for a bin file that should be inside the zip file (Make sure it has up_boot in the file name)

Use an application such as putty to connect to the router as root, and an application such as winSCP to connect to the router (Also as root) to upload the file

upload the file to the /tmp folder, this folder is in RAM not on the flash of the router, so it has more space that can accommodate the procedure

Using Putty, execute the following commands

cd /tmp

On this command here, you will need to replace the name of the file with the name of the file you have uploaded to the router
This command (That starts with DD), trims the first 257*512 = 131,584 bytes from the file which are the boot loader
dd if=yourfilename.bin of=flash.bin skip=257 bs=512

Now you would want to remove the old file after we have trimmed it with DD
rm yourfilename.bin

Now, to the final step, which is actually writing the trimmed firmware to the router
mtd -r write /tmp/flash.bin firmware

Now all you need to do is wait for the router to write the firmware, right after it will reboot and you are done
Changing Windows Fax And Scan storage folder

Well, to make a long story short, I make large scans that don’t need to be on my system disk, I would like to have them stored on the spinning disk, So, i searched online, and found that people were suggesting that I create a symlink to the new location in place of the Scanned Documents folder, Something like

mklink /d "C:\Users\yazeed\Documents\Scanned Documents" D:\scanner

The above obviously has downsides, backup software, changed disk IDs, or other unforeseen effects, In my mind, there is no way the developers of Windows Fax And Scan have hard coded this into the application,

Another solution would have been to move the entire Documents folder (Right click it, then change it’s location, windows provides that option), But not everyone wants that, So there is a third more elegant solution (Even though this works like a charm)

The third is to look in the registry (Find) where Windows Fax And Scan stores it’s path (Look for the word scanned for example), and change that, but i Have already gone with the second, the third should be simple

Connecting to Windows KVM with VNC and putty tunnel

The setup assumed in this post is as follows, you are working on a remote windows computer, there is a Linux KVM host computer running guest virtual machines somewhere (OS of guest irrelevant), and you would like to connect to a guest machine’s console (which may be running windows, linux, macOS, or any operating system)

KVM, by default only allows people to connect through VNC to the console of a virtual machine if they are using the local host computer, so here are the tips on creating a tunnel to the host computer and connecting to your KVM virtual machine.

Windows does not support VNC very well, (Most VNC servers don’t run well on windows), but the VNC server here is not windows, it is KVM that is providing the VNC server to the guest’s console.

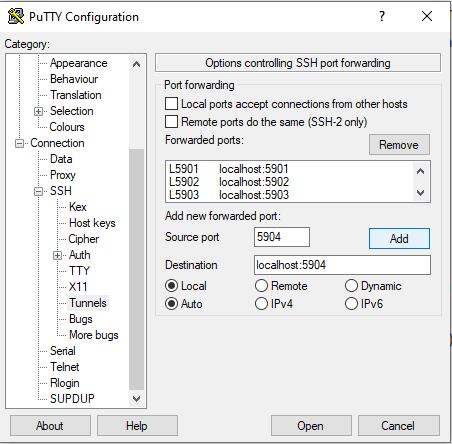
1- Create a tunnel (Putty on windows), simply put, save the connection in putty to that host machine, then under tunnels you will need to have something like this (And go back and hot save again)

Just create a tunnel for port 5900 and the destination localhost:5900 (5901 for the second virtual machine and so on), leave all other tunnel options unchecked/default

2- to know which ones are enabled on your machine run this command

netstat -tlpn | grep 590

3- VNC should now connect to localhost:9500 for example (I am using tightVNC on windows), and that connection should be automatically router to the KVM host, which will display the guest’s console depending on the port (every guest has it’s own port)

Fixed – HP laptop fan very loud and vibrates

The lowdown, applying grease to the fan pin works, no idea for how long (Already ordered a replacement fan from the HP website just in case), but when this fan fails, I will certainly update this post (Today is April 18, 2020).

The only reason i use my HP Envy 17-s143cl which has a slow I7-7500U (X0S43UA) is because it is silent most of the time, and quiet when the fan eventually spins up, not any more, today, the fan was very loud, and vibrates heavily, sometimes banging above the fan resolved it (Don’t try if you have a spinning disk, you will damage it, I have an SSD inside so it is okay).

So i took the laptop apart, extracted the fan, opened the fan casing, and then the plastic fan separates from the coil by simply pulling it out (With very little force, if you need any force you are doing it wrong).

So, like you see in the photos above, I applied some automotive lithium grease to the pin, and put everything back how it was, the fan is working very smoothly, just like before, if it fails and that is a good possibility, I will update this post, but for now, it looks like a hit

Also worth mentioning is that i usually add such lubricant to PC fans, the cheap $1 fans, they usually need the lubricant after a few months, but after adding the lubricant under the back sticker on a desktop PC fan, they usually work for years more without problems, so I expect this to not give me any trouble, but in any case, I have already ordered a replacement just in case, turns out the HP store is cheaper than ebay and amazon, Just go to HP and find the part you need, mine was the one below. it cost me with shipping an all around 32 US dollars.

806747-001 In stock
FAN – for Broadwell SKU (Fanless design for Braswell SKU)
RoHS: COMPLY_2.05

Order subtotal18.26
Shipping and Handling11.25
Tax2.62
Order total (USD)32.13

Quick guide to mounting ISO file in linux

In short, You can (Up to date systems) mount it in 1 go with something like

mount -o loop /path/to/my-iso-image.iso /mnt/iso

Step 1, what is the next loop number we can mount on ?

losetup -f

This will probably result in something like /dev/loop0 (Which is the next ready loop to map the ISO to

losetup /dev/loop0 /path/file.iso

Then, mount the loop device with the mount command

mount /dev/loop0 /mnt/dir

That’s it, The new solution and the old, As always, i keep things here as a not to self, because sometimes I come across older computers, and I forget how it was done since all the mounting I do now the new way

Watermarking Video with ffmpeg

In this post, I will be explaining how to watermark videos with a PNG image watermark that is transparent where it needs to be, I will cover both Linux and Windows (Not much is different on the ffmpeg side, the difference is when you want to traverse a directory (The script).

The watermark you see here is what I want to overlay over the video, If you right click and view the image, you should be able to see that around the text, it is transparent.

The PNG with transparency to be overlaid over the video

now, let us assume that the file in the directory is called x.mp4, and this watermark image is called watermark.png, then the following commands should overlay this image over the video

ffmpeg -i x.mp4 -i watermark.png -filter_complex "overlay=10:10" x1.mp4

The code above will create a new file (x1.mp4) which has the overlaid watermark, as you might be able to see if you execute the above the watermark is positioned at the top left corner of the video, which is not necessarily what you want, now because we know the dimensions of the watermark image, we can ask ffmpeg to center it horizontally (and if you like vertically to have it in the center of the image, but this is not what i want.

So let’s assume the video is full HD, meaning it has the dimensions 1920 x 1080 (Width x Height), and the image, as you can see has the dimensions (500 x 100), what i want here is to have the watermark centered horizontally and nudged down 100 pixels vertically, the code to do that would be

ffmpeg -i z.mp4 -i watermark.png -filter_complex "overlay=x=(1920-500)/2:y=100" z3.mp4

And in case this is not clear, here is a code to place it in the bottom right side of the screen

ffmpeg -i z.mp4 -i watermark.png -filter_complex "overlay=x=(1920-500):y=(1080-100)" z6.mp4

Now with the process of watermarking out of the way, How do we batch process videos under windows and under linux ?

Under Linux it is simple, I put all the input files in a directory named “in” and all the output is to be put in an directory called “out”, the shell script (batch file) is at the root where those 2 directories exist, the shell script is this

!/bin/bash
OIFS="$IFS"
IFS=$'\n'
for filename in "in/"*.mp4; do
ffmpeg -i "$filename" -i /apth_to_watermark/watermark.png -filter_complex "overlay=x=(1920-500):y=(1080-100)" "out/$(basename "$filename" .mp4).mp4"
done
IFS="$OIFS"

I have never been good at windows, so i looked around for a script to traverse a directory, I found some stuff, and here is my final result, if you can clean it up and make it more robust, please do leave me a comment and i will improve with your recommendations.

WordPress, Varnish, nginx: The SSL https detection problem

I have a certain setup with a Varnish5 caching reverse proxy, with nginx to terminate SSL connections.

The problem with this setup is that wordpress can’t detect https, hence, it can not enforce it, nor will it link the CSS accordingly etc…, and if your blog’s address starts with https, you have a problem.

there is more than one solution that i will enumerate here, I chose to force all connections to come through https (The first), but there are others, the one i will present here (Which i did not use) resolves the problem and allows wordpress to detect whether we are on a secure connection or not.

And even though this post-article talks about wordpress, everything here can apply to any PHP application (Or even other applications written in different programming languages)

1- Enforce https for the whole website

The simplest way to solve the problem (Which i chose) is to redirect all traffic to https.

in the varnish script, implement the following

in the sub vcl_recv, implement the following

if (req.http.host ~ "^(www\.)?example\.com$") 
{
	if (req.http.host ~ "^(?i)example.com" || req.http.X-Forwarded-Proto !~ "(?i)https") {
		return (synth(750, ""));
	}
}

Now, the following section is the sub vcl_synth

sub vcl_synth {
    if (resp.status == 750) {
        set resp.status = 301;
        set resp.http.Location = "https://www.example.com" + req.url;
        return(deliver);
    }
}

Once the above is in place in the varnish script, You will need to tell wordpress that it’s all HTTPS (SSL)

We do that in the config file, the only file we know that does not change when we update

define('FORCE_SSL_ADMIN', true);
$_SERVER['HTTPS']='on';

Now, the above should do it if you don’t mind that your website only works in https, if you do want http to remain an option, then here is another solution

Start by creating a phpinfo() page to check whether you have the $_SERVER[‘HTTP_X_FORWARDED_PROTO‘] variable , if you do, your work is partially done, but you need to mind too things

the varnish server needs to only cache the https copy (because most browsers won’t allow mixed content these days, and if the css is linked to as http, it won’t display correctly), you can do that easily with something like the following in the vcl_hash area

if (req.http.X-Forwarded-Proto) {
        hash_data(req.http.X-Forwarded-Proto);
    }

And then, also in the wp-config file, add the following (probably almost anywhere)

if ( isset( $_SERVER['HTTP_X_FORWARDED_PROTO'] ) && $_SERVER['HTTP_X_FORWARDED_PROTO'] == 'https')
        $_SERVER['HTTPS']='on';

Enable adoptable storage for the J5 J500H (3G)

Allowing Adoptable storage on the Samsung J5 20165 – J500H

There are a few tricks for this particular phone
1- We need to replace the recovery system with TWRP

Enable phone developer mode, then USB debugging and OEM override (Disable protection)
Download ODEN
Download the TWRP .TAR file for your device, for the Samsung J5 2016 (J500H), you should find i here
https://twrp.me/samsung/j53gxx.html

reboot your system into bootloader mode (Vol down, Home and power at the same time for 3 seconds to start the phone)

Open ODEN, chose the tar file for AP, and upload the TWRP

Now, don’t let the phone reboot into the system or it will overwrite the bootloader with the original one, instead
once the phone starts rebooting, hit, Volume UP and home button and power at the same time, and TWRP will patch the
system once it opens in recovery mode so that it won’t overwrite the new TWRP

Reboot system, and boot with Power, Home, And volume down button for bootloader change

From this point on, you can enter into TWRP with the Home, Vol UP and Power button combination at boot time

Now download the patch to enable adoptable storage and store it to the SD card (adoptable_storage_enabler_ashyx) from here https://forum.xda-developers.com/galaxy-tab-a/how-to/patch-adoptable-storage-enabler-t3507387

Start the recovery mode (TWRP mode)

Hit install and chose the file you have downloaded

That’s all you need

Now, next thing you will need to do is to format the SD card using the guide here

http://www.tech-g.com/2019/12/01/storing-whatsapp-video-and-photo-to-sd-card-with-no-compromise/

Backup or move an LXC container

You can not just copy an LXC container, wat you need to do is among the lines of

cd /var/lib/lxc
tar --numeric-owner -cf container_125_fs.tar vm125

The magic is mainly about maintaining the numeric owner of files, which is lost when you copy the files using the host machine 😉

you can untar it the same way you untar any other tar file.

for example, to untar it to a different location, you can use the command

tar -xf container_125_fs.tar -C /target/directory

This whole thing is very useful in moving a container to a different directory, then modifying the config file to point to that directory, as well as moving it to a different machine, the reason you can’t just move it is that moving will cause some issues as the move command does not take the ownership differences between host and guest into account.

Storing whatsapp media (video, photo, etc) to SD card.

To have android treat an SD card like internal storage, you will need to format it as internal storage, a feature of android disabled by most manufacturers, so here is how to do it even when the button is missing.

After you get a RELIABLE big SD card, let us get the procedure out of the way, Read below about reliability and dangers etc.. before you decide on getting a cheaper SD card

This feature of android is called Adoptable Storage.

1- On your windows PC (Or mac): Download adb.exe, there are many places to download it on the internet, but for convenience, here is a 64 bit download of the adb.exe file, in my case, it came with Android Stdio, and i found it in C:\Users\yazeed\AppData\Local\Android\Sdk\platform-tools, obviously you will have your username in place of yazeed in the path above

2- On your phone: Open your phone, Go to Settings, About, Software information, And tap repeatedly on Build Number until it informs you that you are now a developer

3- On your phone: A new developer options Menu should appear, Open it and enable USB debugging

4- Connect the phone to the computer via USB cable

5- On your windows PC (Or mac): Open the command prompt (CMD/Shell), I ran it as administrator to avoid any surprises, and run the following commands, obviously, you will need to change the directory to wherever you put the adb.exe file

cd C:\Users\yazeed\AppData\Local\Android\Sdk\platform-tools
adb shell
sm list-disks
** disk:179,64 <= as you can see, this handle/identifier is our SD card inside the phone
sm partition disk:179,64 private

6- Disconnect the wire.

7- Go to settings => storage => sd card (where yo normally format an SD card), then from the three button menu on the top right, select Migrate data, this will move the existing data from internal to SD card.

So right now, We have formatted the SD card as internal storage, the way this works is that the SD card is overlayed over the existing storage, so whatever you already have on your internal memory is not masked by mounting a new SD card in it’s place, but whatever you save from this point on will be saved to the SD card.

ProsCons
* The SD card size is added to the internal phone storage so you can install apps on the SD card and have apps store data on SD card when they don’t offer the option to do that natively

* The internal phone flash memory is not consumed as fast due to flash wear, even though phones usually fail for other reasons before the flash failiure occures, it is mentioned here for completeness

* You can not plug this SD card into your computer, in fact, you are expected to never ever remove it from your phone, this is to avoid catastrophic failiure and data loss

* If your SD card fails or otherwise goes bad, data loss will not only affect the data, but also afects your applications and settings, making the damage much worse

* A slow SD card might affect your phone’s performance.

There are a few things to keep in mind, I ordered them by importance, most important first.

  • ADB.EXE is a file from google, part of the development tools, and not a third party tool, it’s for android debugging by the people who make android
  • *RELIABLE: The SD card you chose must be super reliable as failure of the card will result in loss of your data, applications, settings, and your phone’s functionality in general, making it much worse than when using the SD card as external storage, Get an SD card with wear leveling, as the ext2/ext4 file system that android uses is not too good with flash memory, I personally use sandisk, some sandisk models explicitly state that they have wear leveling, get those, and beware, there are many many fake SD cards on the market, so get it from a reliable source.
  • *FAST: The SD card you chose needs to be fast, the faster the better, even though at some point, the speed of the SD card hits the phone’s limit (the speed the phone can access the SD card), having a very fast SD card will ensure fastest possible operation of your favorite apps
  • *One partition: I have seen people online split the SD card into some internal storage, and some external, but they provide no justification to the benefits of this, as windows will only read the first partition of the disk, My advice is to use the whole SD card as internal, as ther benefit of having part of it as external storage is debatable at best.In case you are wondering how that is done, in place of the line where it says
    sm partition disk:179,64 private

    You will need to use

    sm partition disk:179,64 mixed 20

    The alternative line you see above will create an internal storage partition of 80% and leave 20% as external SD storage

  • *WHATSAPP: The main reason i did this to my phone is that my whatsapp messenger is bombarded with gigabytes of video all the time, and whatsapp does not natively allow for storing media files such as video to external SD cards, in this solution, there is no compromise as the solution is invisible to whatsapp, whatsapp now stores media to the SD card with no real compromise.
  • Why is it disabled in most phones: This is a good question, The official reason, which is a valid, legitimate reason, why companies like samsung asus and others disable this feature is reliability, manufacturers can’t guarantee that yo did your homework and got a reliable and fast SD card, they also can not guarantee you will not accidentally switch the phone on after removing the card, or even remove the card while the phone is running, so in short, leaving this feature in is unwise for the average user, a great side effect (To them) from this legitimate reason is that they can sell larger capacity phones at a higher price and a higher profit margin, but that is irrelevant as the first reason is very legitimate.
  • *Learn: To learn more about the technology, you can visit the Adoptable tech page on the official android website, https://source.android.com/devices/storage/adoptable
  • * Temporarily taking it out: Most phones these days come with Dual SIM, and in most cases, an SD card slot that takes the place of the second SIM card, the issue here is that if you ever need to use the second SIM card slot for a SIM card, you can not just temporarily pull the SD card out without causing massive damage to your apps and data, god knows how the system and it’s sb systems will react to missing data and applications, probably by recreating them blank again, and when you insert the SD card again, there will be a clash of file names.