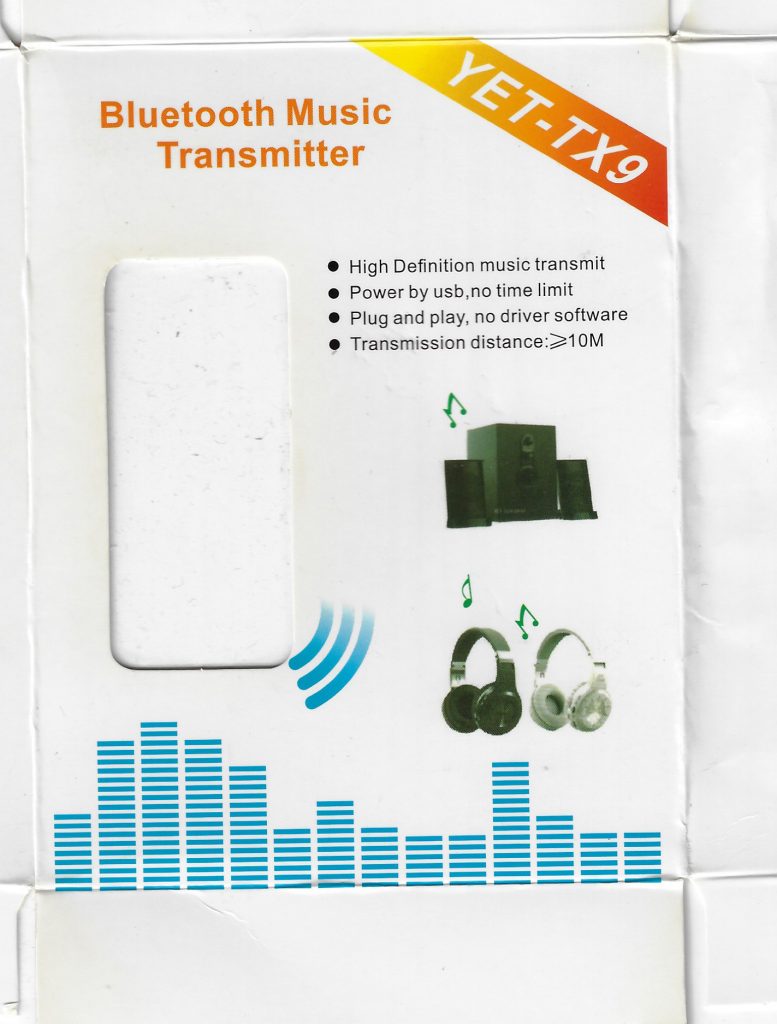
Bluetooth Audio Transmitter from 3.5 Audio Jack

I have an android TV box with no Bluetooth, installing Bluetooth dongles to it does not work, So i got a nice little Bluetooth transmitter that receives audio from a regular headphones jack, and transmits it to a Bluetooth speaker ! the YET-TX9 (Amazon for $19 but i have my doubts it is the best option)

Please note: As an Amazon Associate I earn from qualifying purchases such as the one above.

There is no user’s manual inside, the instructions are, as you can see, printed on the box.

Will come here and add the details as soon as i try it out

Forcing color change for visited links

Do you remember the days when your browser would always tell you what links you have followed before ?

For a very long time now, CSS has allowed webmasters to chose the same color for the link that has been visited as the link you have never visited, favoring aesthetics over functionality, well that is okay, but i don’t like it that way, so what to do

As a firefox user, I have an option to create a file inside my firefox profile ({firefoxProfile)/chrome/userContent.css), but it will not work out ofg the box, you also need to open about:config, then switch “toolkit.legacyUserProfileCustomizations.stylesheets” to true

That’s it, but you might also need to restart FireFox

Getting started with water cooling

I am no expert on water cooling a PC, but i have done a bit of research, and I am keeping things here for my reference

1- Do use distilled water, there is nothing wrong with it, unlike what people who sell coolant will try to tell you, it is working perfectly for me, I added about 20% car coolant to it for both color and other relevant properties

2- BOIL the distilled water to get the oxygen out of it, otherwise, over time the water will become still in the system, forming bubbles.

My pump already has a small reservoir

The system is very simple, Pump to block to radiator then back to pump, took much less time to assemble than i thought

Seagate Backup Plus HUB internal disk

I got an external USB3 8TB disk from Costco, namely the STEL8000401 Seagate Backup Plus Hub, the enclosure includes a USB3 HUB, and an 8TB 3.5 inch hard drive inside

upon opening the shell, I was presented with an 8TB SATA 3 6Gb/s drive with the model number ST8000DM004

According to the datasheet of the hard drive, this is an SMR drive *(Shingled magnetic recording)

Seagates markets this hard drive as a desktop hard drive, but beware, SMR drives are slow on writing, so when you are using the drive for a mostly read scenario, it may be good, but if your application is write intensive, this is not a good hard drive for that purpose

Also, from the datasheet, this drive spins at 5400RPM, opposite to my older seagate barracuda 8TB (ST8000DM002) which is a 7200 and is not an SMR drive

I will be doing some more experimentation with this drive in a bit, and post the results here

Sequential Write

The lowdown: 130 MiB/s sequential Write, and 132 sequential read ! the older drive has a 230MiB/s sequential read

The first experiment is using PV, for those who do not know, PV is like DD but somewhat more advanced, I will be copying the drive ST8000DM002 to the new ST8000DM004, after passing the 10GB mark, the transfer speed from one disk to the other was around 130 MiB/s (Speed of writing to the new SMR drive). Again, regardless of the data, this is a byte for byte copy including blank areas, therefore this is an example of a sequential write. for comparison, writing the same data to /dev/null (read on the old drive) results in 230 MiB/s meaning the bottleneck is writing to the SMR drive. reading from the newer SMR drive to /dev/null results in 132 MiB/s which is surprisingly similar to its read speed.

Lock PC after 20 minutes

I am not that great with windows, a look at all the posts on this blog will tell you that, Now with that said, I need to lock my laptop (Windows !) after a few minutes of inactivity.

Step 1/3: Check if you have Security policy installed

Windows 11 HOME shipped without this tool, as it came in the pro and the enterprise. to figure out if you have the tool, Hit start and start typing secpol.msc, if all you see is a suggestion to do a web search instead of an Application, you do not have it, the next step will explain how to install it, If it is indeed there, you can skip step 2 and go to step 3 right away

Step 1/2: Installing GroupPolicy

You only need to do this if in the step above it turned out that Group Policy is not installed on your system.

To Install/Enable Local Security Policy (secpol.msc), you will need to install Group Policy, to get that directly from Microsoft, you can run the following script as administrator (Download link also provided gpedit-enabler.bat), this is courtesy of Major Geeks

@echo off 
@echo "This batch file from MajorGeeks.Com will enable Group Policy Editor (Gpedit.msc) on Windows 10 Home."
@echo "If this method fails, there are other methods to try at https://tinyurl.com/majorgeeksgpedit"
pushd "%~dp0" 

dir /b %SystemRoot%\servicing\Packages\Microsoft-Windows-GroupPolicy-ClientExtensions-Package~3*.mum >List.txt 
dir /b %SystemRoot%\servicing\Packages\Microsoft-Windows-GroupPolicy-ClientTools-Package~3*.mum >>List.txt 

for /f %%i in ('findstr /i . List.txt 2^>nul') do dism /online /norestart /add-package:"%SystemRoot%\servicing\Packages\%%i" 
pause

Step 3/3: Modify security policy to lock screen after 20 minutes

To do that, you run secpol.msc, then look for 

Local Policies > Security Options “Interactive Logon: Machine inactivity limit” and set that to 1200 (20 minutes), 

then restart the computer

and there you have it, the windows login screen will appear after 20 minutes of inactivity, you don’t need to set a screensaver or even connect this to your screen timeout (which is 10 minutes in my case)

Notes about the installation

Running the above batch file as administrator should result in the following being printed.

"This batch file from MajorGeeks.Com will enable Group Policy Editor (Gpedit.msc) on Windows 10 Home."
"If this method fails, there are other methods to try at https://tinyurl.com/majorgeeksgpedit"

Deployment Image Servicing and Management tool
Version: 10.0.22621.1

Image Version: 10.0.22621.608

Processing 1 of 1 - Adding package Microsoft-Windows-GroupPolicy-ClientExtensions-Package~31bf3856ad364e35~amd64~ar-SA~10.0.22621.1
[==========================100.0%==========================]
The operation completed successfully.

Deployment Image Servicing and Management tool
Version: 10.0.22621.1

Image Version: 10.0.22621.608

Processing 1 of 1 - Adding package Microsoft-Windows-GroupPolicy-ClientExtensions-Package~31bf3856ad364e35~amd64~en-US~10.0.22621.1
[==========================100.0%==========================]
The operation completed successfully.

Deployment Image Servicing and Management tool
Version: 10.0.22621.1

Image Version: 10.0.22621.608

Processing 1 of 1 - Adding package Microsoft-Windows-GroupPolicy-ClientExtensions-Package~31bf3856ad364e35~amd64~~10.0.22621.521
[==========================100.0%==========================]
The operation completed successfully.

Deployment Image Servicing and Management tool
Version: 10.0.22621.1

Image Version: 10.0.22621.608

Processing 1 of 1 - Adding package Microsoft-Windows-GroupPolicy-ClientExtensions-Package~31bf3856ad364e35~amd64~~10.0.22621.608
[==========================100.0%==========================]
The operation completed successfully.

Deployment Image Servicing and Management tool
Version: 10.0.22621.1

Image Version: 10.0.22621.608

Processing 1 of 1 - Adding package Microsoft-Windows-GroupPolicy-ClientTools-Package~31bf3856ad364e35~amd64~ar-SA~10.0.22621.1
[==========================100.0%==========================]
The operation completed successfully.

Deployment Image Servicing and Management tool
Version: 10.0.22621.1

Image Version: 10.0.22621.608

Processing 1 of 1 - Adding package Microsoft-Windows-GroupPolicy-ClientTools-Package~31bf3856ad364e35~amd64~ar-SA~10.0.22621.608
[==========================100.0%==========================]
The operation completed successfully.

Deployment Image Servicing and Management tool
Version: 10.0.22621.1

Image Version: 10.0.22621.608

Processing 1 of 1 - Adding package Microsoft-Windows-GroupPolicy-ClientTools-Package~31bf3856ad364e35~amd64~en-US~10.0.22621.457
[==========================100.0%==========================]
The operation completed successfully.

Deployment Image Servicing and Management tool
Version: 10.0.22621.1

Image Version: 10.0.22621.608

Processing 1 of 1 - Adding package Microsoft-Windows-GroupPolicy-ClientTools-Package~31bf3856ad364e35~amd64~en-US~10.0.22621.608
[==========================100.0%==========================]
The operation completed successfully.

Deployment Image Servicing and Management tool
Version: 10.0.22621.1

Image Version: 10.0.22621.608

Processing 1 of 1 - Adding package Microsoft-Windows-GroupPolicy-ClientTools-Package~31bf3856ad364e35~amd64~~10.0.22621.457
[==========================100.0%==========================]
The operation completed successfully.

Deployment Image Servicing and Management tool
Version: 10.0.22621.1

Image Version: 10.0.22621.608

Processing 1 of 1 - Adding package Microsoft-Windows-GroupPolicy-ClientTools-Package~31bf3856ad364e35~amd64~~10.0.22621.608
[==========================100.0%==========================]
The operation completed successfully.
Press any key to continue . . .


In addition to the above, A file should be produced in the same folder as the batch file named List.txt, in my case, the file had the following contents

Microsoft-Windows-GroupPolicy-ClientExtensions-Package~31bf3856ad364e35~amd64~ar-SA~10.0.22621.1.mum
Microsoft-Windows-GroupPolicy-ClientExtensions-Package~31bf3856ad364e35~amd64~en-US~10.0.22621.1.mum
Microsoft-Windows-GroupPolicy-ClientExtensions-Package~31bf3856ad364e35~amd64~~10.0.22621.521.mum
Microsoft-Windows-GroupPolicy-ClientExtensions-Package~31bf3856ad364e35~amd64~~10.0.22621.608.mum
Microsoft-Windows-GroupPolicy-ClientTools-Package~31bf3856ad364e35~amd64~ar-SA~10.0.22621.1.mum
Microsoft-Windows-GroupPolicy-ClientTools-Package~31bf3856ad364e35~amd64~ar-SA~10.0.22621.608.mum
Microsoft-Windows-GroupPolicy-ClientTools-Package~31bf3856ad364e35~amd64~en-US~10.0.22621.457.mum
Microsoft-Windows-GroupPolicy-ClientTools-Package~31bf3856ad364e35~amd64~en-US~10.0.22621.608.mum
Microsoft-Windows-GroupPolicy-ClientTools-Package~31bf3856ad364e35~amd64~~10.0.22621.457.mum
Microsoft-Windows-GroupPolicy-ClientTools-Package~31bf3856ad364e35~amd64~~10.0.22621.608.mum

Linux on first generation I7 with no graphics card

Linux would not normally boot as soon as you take away the graphics card, the solution to this is to set it to serial mode, with Grub 2 (Such as debian buster and bullseye), there is no menu.1st file, and you should not edit /boot/grub/grub.cfg by hand, what you need to edit is /etc/default/grub, in this file you will need to

1- Change GRUB terminal to console and ttyS0. This will provide one GRUB to a monitor display and serial console.
2- Remove hidden parameter for avoiding “no video mode activated” error. And change GRUB timeout from 8 seconds to 1 second.
3-Change linux kernel console to tty1 and ttyS0. This setting will be taken over to userland, and there will be two login prompt for tty1 and ttyS0.

On my debian setup, the file looks like this, and it works, but make sure to take a backup of the file just in case before you modify anything

Now you will need to run the command

update-grub

Finding static ip machines on openwrt

As soon as you enter the LUCI interface of openwrt, you are presented with a bunch of DHCP leases corresponding to all the machines that got their IP from DHCP, but what about the computers that have static IPs ?

The answer to that is that there is no place where all this data is stored on the router, and you must scan for all machines

a tool to help you do that is arp-scan, just go into packages and install it, or simply run the command “opkg install arp-scan” from the ssh session, right after, you should be able to run the command as follows

arp-scan –interface br-lan –localnet

but this will not necessarily be the correct command, you will need to find the name of your LAN interface which is simple from interfaces in LUCI

As of now, the current version of arp-scan has a bug, where it displays the following error

arp-scan -I br-lan -l
Interface: br-lan, datalink type: EN10MB (Ethernet)
WARNING: Cannot open MAC/Vendor file /usr/share/arp-scan/ieee-oui.txt: No such file or directory
WARNING: Cannot open MAC/Vendor file /usr/share/arp-scan/ieee-iab.txt: No such file or directory
WARNING: Cannot open MAC/Vendor file /usr/share/arp-scan/mac-vendor.txt: No such file or directory
Starting arp-scan 1.9.5 with 256 hosts (https://github.com/royhills/arp-scan)

15 packets received by filter, 0 packets dropped by kernel
Ending arp-scan 1.9.5: 256 hosts scanned in 1.852 seconds (138.23 hosts/sec). 0 responded

The solution to that is by manually installing the newer arp-scan package

Reference for my 3D printer

This 3D printer was built back in 2015, I am adding this post here because I don’t remember much about it and i would need to rebuild it today for a certain project i have in mind.

My 3D printer, Prusa i3 with RAMPS 1.4 and a heated bed, started off with the config file from the FolgerTech i3-2020, the 0.4mm Brass Extruder Nozzle, 30mm M6 Tube, FILAMENT 1.75 mm

The entry that comes with the config files has a problem with DEFAULT_AXIS_STEPS_PER_UNIT, by default it comes with the values { 80, 80, 4000, 104.4 }, the third one (Z axis) has a problem that my rods are different, and the last one for the ext ruder has double the value assuming we have microsteps, So i reverted to the one in the 1.1.5 that is already installed, namely

define DEFAULT_AXIS_STEPS_PER_UNIT   { 80, 80, 2580, 52.2 }

The Z axis probably needs more refinement though, as the higher the build, the more problems you have close to the top

In this config file, I have the MOTHERBOARD set to BOARD_RAMPS_14_EFB instead of 33, this is all good for the 1.1.5 and the 2.0.x, previously they were numbers, and they probably still are (Value of this)

define BOARD_RAMPS_13_EFB 33 // RAMPS 1.3 / 1.4 (Power outputs: Extruder, Fan, Bed)
 define BOARD_RAMPS_13_EEB 34 // RAMPS 1.3 / 1.4 (Power outputs: Extruder0, Extruder1, Bed)
 define BOARD_RAMPS_13_EFF 35 // RAMPS 1.3 / 1.4 (Power outputs: Extruder, Fan, Fan)
 define BOARD_RAMPS_13_EEF 36 // RAMPS 1.3 / 1.4 (Power outputs: Extruder0, Extruder1, Fan)

Extruder and heat bed

Even though i use a solid state relay for the extruder, the heated bed uses an automotive relay switch, so PWM is a big no no, we will need to comment the line where it reads define PIDTEMPBED, we also MIGHT WANT TO (only if needed) to fix some stuff in config advanced file.

if DISABLED(PIDTEMPBED)
 #define BED_CHECK_INTERVAL 5000 // ms between checks in bang-bang control
   #if ENABLED(BED_LIMIT_SWITCHING)
     #define BED_HYSTERESIS 2 // Only disable heating if T>target+BED_HYSTERESIS and enable heating if T>target-BED_HYSTERESIS
   #endif
 endif

the above means, check every 5 seconds, the rest is self explanatory in the code comments

Next, the end-stops, Z_PROBE_OFFSET_FROM_EXTRUDER for example (Height) is the most important one, as the others will simply print in the wrong location on the bed which besides loosing bed space is not really a problem

Could not find this setting in Marlin 2.0, pending further investigation

Now, the bed size, the whole bed is 20CMs, but there are screws at the edges, so I will go with 19 and add some 0.5 offset

Remember to uncomment “PROBE_MANUALLY” since i don’t have a probe ATM, also uncomment LCD_BED_LEVELING and leave RESTORE_LEVELING_AFTER_G28 uncommented (and leave ENABLE_LEVELING_AFTER_G28 commented the way it is)