Repairing the Prius HV traction battery

Attention: the stuff/information you need is at the beginning, Most of the stuff that follow the practical section you will not need (The some theory section), whatever more you see is for my reference, for the curious, and for those who are wondering why i do it this way.

The lowdown: I have successfully repaired my 2014 (3rd gen) Prius battery, despite the fact that most information on rebuilding your Prius battery online is Bull, almost as if it were engineered so that you kill the remaining good cells after a month or two.

Update Dec, 10 2024: The battery was rebuilt somewhere around the end of COVID, probably 2021 or early 2022 (Yes, i really don’t remember), it is still working perfectly on a car that commutes 200KMs per day, 5 days a week, besides its daily town use, proving beyond any doubt (in my mind) that i was right, YOU PAIR SIMILARLY HEALTHY BATTERIES AND DO NOT CONNECT WEAK BATTERIES WITH HEALTHY ONES, THE ADVICE ON THE INTERNET IS THE OPPOSITE OF WHAT YOU SHOULD DO…. Why this is follows in this post

Here are the tools you need

  • An android phone (You can use Apple/iPhone with torque pro, but the instructions here are for android)
  • The Torque Pro app on the phone
  • Prius PIDs for torque pro (Download here)
  • A compatible OBD2 adapter, I use a WiFi adapter, you can use a Bluetooth or any other that works with torque pro
  • A laptop with software like excel or LibreOffice calc, A paper and pen should also work
  • A charger capable of charging a battery of 6 NIMH cells (Battery means in series), I use the SKYRC imax B6 mini (I don’t, I use my own home made charger built with an arduino, a acs712 current sensor, and a screen, but for the purpose of this tutorial, we need a charger so the imax B6 mini should do the trick)
  • Car headlight lamps (To drain the batteries)

Like everyone else, it all started with CHECK HYBRID SYSTEM STOP THE VEHICLE IN A SAFE PLACE getting displayed on my center “multi information display / instrument panel” or MID for short.

Connecting the OBD2 adapter resulted in fault code (P0a80) other relevant codes might display with P0a80 such as p3011, p3012, p3013 etc. which should point you to the failing module pairs that are causing the failure. in my case, I only had the P0a80.

Prius battery terminology (As per Toyota)

Hybrid battery: the whole Prius traction battery pack of 28 modules
Module Pair: the car reads voltages of modules in pairs, So voltages of the 28 modules in a Prius battery are reported to the car as 14 values, meaning every 2 modules are read together as the sum of the voltage of those 2 modules.
Battery Module: in a Prius battery, every 6 cells are enclosed in a sealed container called a module, this is why you don’t directly see the cells, a module’s nominal voltage is 7.2, which is the nominal voltage of 1 cell multiplied by 6.
Battery Cell: A 1.2V NIMH cell that you will not see because it is hidden inside a module.

So, without further ado, let us get started

Diagnosis, which modules are bad

Before we take the battery out, we can save a hell lot of time by looking at what the car has to say about it’s battery pack.

I have broken this down to steps you see below

  • Install torque pro to your phone (android in my case)
  • Download the Prius 3rd Gen PIDs file by clicking here
  • extract the file you have just downloaded to the (/.torque/extendedpids) directory in your phone
  • Open torque pro, and go to the Menu -> Settings -> Manage extra PIDs/Sensors -> Menu -> Add predefined set.
  • Create an Realtime Information page in torque pro to display battery voltages in real time such as the one below, you start with an empty page, then add (tiny) displays corresponding to voltages of individual modules, I personally like to add the Min and Max voltage entries to make it easier to know when you have found what you are looking for while driving without having to scan through the batteries
  • Clear the error code, switch the car off then on again, the car should now appear to be working fine as if the battery is okay, this is obviously just for the test as the car will soon find out the problem again and inform you of your problem
  • Now, once connected and information is displayed, find a nice uphill climb that is not too steep, with no traffic, at the bottom of that climb, floor the break and gas pedal at the same time, this will charge the battery, then on EV, start climbing wile recording your phone screen, the battery should drain really fast and you will either hear the engine running, or the “Check hybrid system” message should appear again, either way, you now have a reading of which batteries drained very fast…
  • Inspect the recorded screen recording, and figure out which modules are the ones causing the problem, please note that there may be other modules in bad shape, but for now, the worst ones are clear

Taking the battery out of the car

To be able to pull the battery out of the car, you will need to take the following steps

Some theory

The 20% to 80%

Q: Why does the car consider the battery fully charged at 80%, and depleted at 20% of the batteries actual capacity ?

A- Why the 80% cap ?

Let us start with why it caps at 80% ! (At 80 percent, 100% will display on your instrument cluster)

The most common theory (that i don’t find convincing) is that the car wants to leave headroom for regenerative breaking, if it were so, why does it start using the gas engine’s breaking at 80% ? burning fuel, and defeating the purpose of regenerative breaking ?

My own theory is that there are multiple reasons, of which the headroom theory above is not one… here are the reasons i expect the car was designed this way

1- NIMH batteries heat up once you are charging above 80%, which is wasted energy, so the car is expected to try an use up the battery back down to the happy 6/8 area.
2- Heat is bad for the module’s health, and the health of the modules around it (See 1)
3- When modules in module pairs become mismatched health wise, this 20% headroom spares the weaker cell the overcharge and the damage associated with it., illustration will be added soon.

B- And the 20% depletion mark ?
NIMH cells can be depleted to ZERO, in fact, the company that makes the enelope batteries for Panasonic calls depleting the battery to zero and then charging it again a refresh function.

The area between 0.9V and zero volts has very little energy, as most energy is delivered between 1.3 and 1 volt, but still, this area is much less than 20% ! so why 20%

1- Unlike gas cars, hybrid vehicles do not have a 12V starter motor, the gas engine in a hybrid car is started by the electric motor itself, the same one used to propel the car is used to start the engine, if the battery falls below 20%, especially as batteries start to age, there will not be enough power to start the engine, more to that, the batteries have internal resistance, so the car needs to be sure that when it is parked for a few days (or months), it will have enough traction battery power to start the gas engine.

The best Bluetooth transmitter (And receiver)

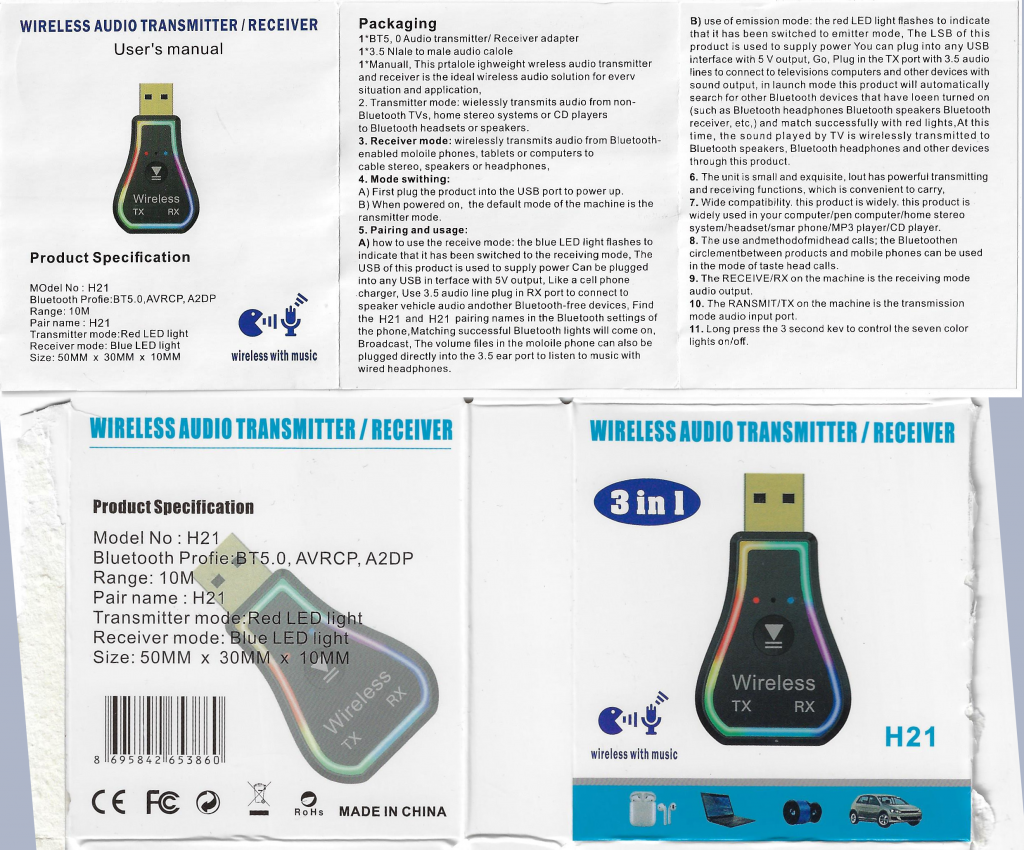
I am writing a post about this device because I was positively surprised by it

I have a TV connected to an android TV box, neither the TV nor the android box have bluetooth, So i have tried quite a few bluetooth transmitters, where you connect the AUX jack from the TV out to the transmitter, and the transmitter automatically pairs with the bluetooth speakers, never went well, either the voice is really bad, or it does not work, this is all until i found this little cool guy

So, how those transmitters usually work is you power the thing from USB, then connect the auxiliary jack, to my surprise, even though this did have a 3.5MM aux jack, it was detected by my android box as a USB sound card, and it worked without me doing anything

It doubles as a BT receiver too, but those are all over the place, and not exactly why i like this, So now it is clear what they mean by 3IN1, it has a jack for input, output and also works as USB sound ! Amazing stuff

Tunneling Firefox traffic through SSH – Putty

I will here assume you already have a remote Linux machine that you can SSH into with putty, the instructions are simple from this point on

Putty Setup

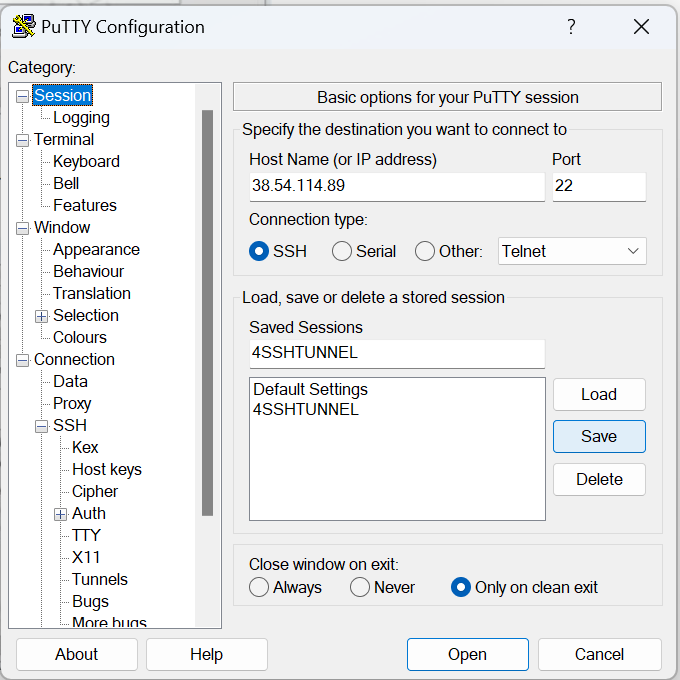
1- Basic putty settings, assuming you have already downloaded putty from chiark.greenend.org.uk, now open putty, enter the IP of the server you wish to tunnel through, and save it with a name, the steps are…
– Open putty,
– enter the IP of your remote machine
– give it a name of your choice
– save (You don’t need to save now, you will save again in a bit, but you can do it anyway)

2- Go to Connection and expand it, then expand SSH, then select Tunnels, this will show a dialogue such as the below, fill in the data as follows

  • A Source port between 1025-65536 (of your choice), i chose 8081 but you can chose any other in that range
  • Check Dynamic and Auto, the click Add

3- From the menu on the left, go back to Session, and click the save button again (So that the new tunnel settings are saved for next time)

4- You are almost done, Now double click the saved session name or select it and hit open, the remote machine should now prompt you to enter a username and a password, once you enter those, you have a tunnel ready on your localhost (127.0.0.1) on port 8081, next we will setup Firefox to use that tunnel

Firefox setup

1- Go to firefox settings (Click the accordion menu to the right, and chose settings), once open, scroll down under general, until you find the Network Settings section, click the settings button in that section

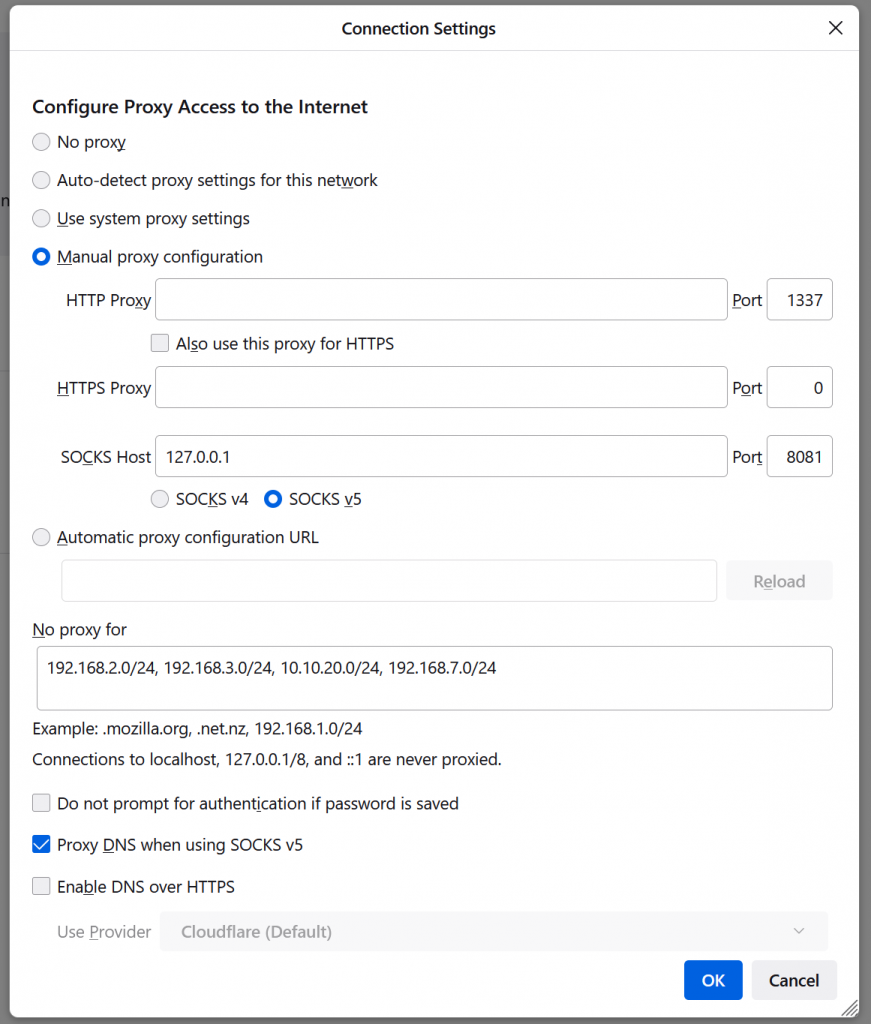
Clicking settings above will show the following popup dialogue, setup your system as follows

  • Manual Proxy Configuration
  • SOCKS Host enter 127.0.0.1 and in the port area of that the port we chose in putty (In my case, 8081)
  • Optional – Add the IP address ranges of the IPs that you do not want to have tunneled through the remote machine
  • For more privacy, and sometimes functionality (When access is blocked from abroad), make sure you tunnel your DNS queries as well (See checkbox below)

Now, to verify that you are conencted to the remote machine, google the following

what is my ip

and google should tell you what your IP address is, at this stage, it should be the same as the remote machine’s IP (Not yours)

Linux

To do this in Linux, it is much easier, simply start the session with the remote machine with the following line

ssh -D 8081 qworqs@your_hostname_or_ip

Free SSL certificates with Let’s encrypt, step by step

Let’s encrypt is a Certificate Authority (CA) run by Internet Security Research Group (ISRG), and is sponsored by some of the biggest name in the web industry

You are probably here to create a certificate, not get a history lesson ! so Let me cut the chase, for those who want to know more, there is always wikipedia (Let’s encrypt on Wikipedia)

So let’s encrypt provides certificates for domain names, including wildcard certificates (Which I will get to by the end of this article), What we are going through here is the manual process, which serves to give you a taste of how things work, in practice, you are encouraged to use on of the automated methods for multiple reasons, one compelling such reason is that Let’s encrypt issues certificates valid for three months only ! You don’t want to have to cater to your certificate every three months do you ?

To simplify things, I will create a step by step video to demonstrate the creation process ! and post it here, but for now, I will simply take you through the steps, in this tutorial, all you need is SSH access to any server including one you have at home ! or even maybe a virtual machine running Linux inside your windows computer, anything goes, once you have a certificate, you can move it to your production server, this allows me to keep this as general as possible, and this is done using the –manual option, So without further ado, let me get to it

1- login to a linux server and install certbot, the tool that allows you to get certificates from let’s encrypt, On the official website, they promote the use of SNAP, here, I will skip snap and use Debian’s repository ! simpler and there is no need to get into snap

apt install certbot

Now that you have certbot, let us create a certificate for the domain example.com (replace it with your own)

certbot certonly --manual --preferred-challenges http

The –preferred-challenges directive allows you to specify what challenge (http or dns) you would like to perform, the manual plugin is basically the same as webroot plugin but not automated, which is a hassle to keep up to date as this form of issuance needs to be renewed manually every 3 months, (You can take extra steps to automate this) which i will describe later on another post to keep things tidy

Now, as soon as you enter the above, you will enter an interactive dialogue with the following steps

Note: If you want to create a wildcard certificate for your domain name, let’s encrypt allows the use of the * wildcard, but only supports DNS challenge, so the command must reflect that, So when asked for a domain, simply enter *.example.com (or -d ‘*.example.com’), should work normally

As soon as you are in, you will be asked

1- An email for notifications
2- Do you agree to the terms of service ?
3- Would you like to subscribe to the newsletter ?
4- enter your domain names (you should enter both example.com and www.example.com separated by either a comma or a space)
5-

Create a file containing just this data:

Pg1xJ.........-88

And make it available on your web server at this URL:

http://example.com/.well-known/acme-challenge/Pg1...........xuu_0

6- Now you need to create the 2 challenge files, one for exmaple.com and the other for WWW.example.com

Create a file containing just this data:

Ud4m81x..............zupbWEz-88

And make it available on your web server at this URL:

http://www.example.com/.well-known/acme-challenge/Ud4........550

(This must be set up in addition to the previous challenges; do not remove,
replace, or undo the previous challenge tasks yet.)

--------------------------


IMPORTANT NOTES:
 - Congratulations! Your certificate and chain have been saved at:
   /etc/letsencrypt/live/example.com/fullchain.pem
   Your key file has been saved at:
   /etc/letsencrypt/live/example.com/privkey.pem
   Your certificate will expire on 2023-03-11. To obtain a new or
   tweaked version of this certificate in the future, simply run
   certbot again. To non-interactively renew *all* of your
   certificates, run "certbot renew"
 - If you like Certbot, please consider supporting our work by:

   Donating to ISRG / Let's Encrypt:   https://letsencrypt.org/donate
   Donating to EFF:                    https://eff.org/donate-le

At this stage, there are things you should remain aware of

1- DO NOT RENAME OR MOVE THE CERTIFICATES, they need to be in place for renewal if you decide to not automate and check on your certificates every 3 months.

2- Copy (Don’t move) them to the ssl directory, and add them to your config files, the only files you will need to include in your nginx or apache2 config are as follows

For apache 2, you need to use the following 2 lines, modify the path to the files to wherever you have placed them

      SSLCertificateFile /etc/apache2/ssl/example.com/fullchain.pem
      SSLCertificateKeyFile /etc/apache2/ssl/example.com/privkey.key

And for nginx

        ssl_certificate /etc/nginx/ssl/allspots.com/fullchain.pem;
        ssl_certificate_key /etc/nginx/ssl/allspots.com/privkey.pem;

So, restart apache or nginx, and you should be able to see the certificate in action, so this is the simplest way to use let’s encrypt, in my next post, I will

Now, after 3 months, the simplest way to renew the certificate is to issue the command

certbot certonly --force-renew -d example.com www.example.com

Can I use Clockwork with codeigniter 3 ?

Yes you can, but not the latest, CodeIgniter support was dropped at one point, but nothing is stopping you from using the old version of clockwork !

Clockwork is maintained by itsgoingd, with the relevant projects here (https://github.com/itsgoingd)

Clockwork’s codeigniter support was dropped with Clockwork 2, but you can still use Clockwork V1.x (Statement from itsgoingD himself here https://github.com/itsgoingd/clockwork/issues/333), Version 1 can be downloaded at (https://github.com/itsgoingd/clockwork/tree/v1), 1.6 seems to be the last V1 published.

But there are a few caveats, for example, what browser extensions work with Clockwork V1.6 ?

Mounting unclean NTFS windows drive in Linux

Whenever i get the following message

mount /dev/sdd1 /hds/sgt2tb
The disk contains an unclean file system (0, 0).
Metadata kept in Windows cache, refused to mount.
Falling back to read-only mount because the NTFS partition is in an
unsafe state. Please resume and shutdown Windows fully (no hibernation
or fast restarting.)
Could not mount read-write, trying read-only

The command

ntfsfix /dev/sdd1

resolves the issue, and produces the following message

Mounting volume... The disk contains an unclean file system (0, 0).
Metadata kept in Windows cache, refused to mount.
FAILED
Attempting to correct errors...
Processing $MFT and $MFTMirr...
Reading $MFT... OK
Reading $MFTMirr... OK
Comparing $MFTMirr to $MFT... OK
Processing of $MFT and $MFTMirr completed successfully.
Setting required flags on partition... OK
Going to empty the journal ($LogFile)... OK
Checking the alternate boot sector... OK
NTFS volume version is 3.1.
NTFS partition /dev/sdd1 was processed successfully

The same mount command you see here will now work flawlessly

mount /dev/sdd1 /hds/sgt2tb

I am still unsure what process from the mentioned above is responsible, as this oftentimes pops up on drives that were never system drives, so there is no hibernation file problem

Mounting a remote Linux file system as a Windows drive

You can do this in many ways, the most popular of which is SAMBA, but this is not the software we are using, here we are using SSHFS

The software this post is about is SSHFS, if you are reading this, you probably know what SSH is (Secure shell), and FS stands for File System

Ironically, you will only need to have SFTP and not SSH with shell access, so here is the first surprise, Now, to continue with this tutorial, you might want to visit the page I have posted here to create that user and give him/her access to the directory to be mounted, don’t worry, there is a link back here at the bottom of that page !

So, now that you have created that user account on the remote system, let’s get down to business

You will need 2 peices of software, or 3 if you would like to use private/public key authentication

For the following software, look on their websites for the latest installers for your version of Windows (Usually you are looking for the msi of the 64bit version of windows)

1- WinFsp, short for Windows File System Proxy, What this basically does is enabled the developer of SSHFS-Win to make it look like a windows drive, not some separate SFTP application where you have to move the files manually, when you present it as a drive, you can modify files directly on it, which is the main advantage, and it will do the work in the background, it is a driver that presents itself on/to windows as a disk, while cheating the disk contents from another application, the github page for it is at https://github.com/winfsp/winfsp, or to save you time, Just go directly to the download page here https://github.com/winfsp/winfsp/releases/tag/v1.11 , When presented with optional components, if you are not a developer, you will only ever need the Core package, which is the installer’s default

Once WinFsp is installed, we are done with the part that allows us to display file systems that are not really filesystems, the next step is to have something feed that with data from an actual filesystem somewhere else ! via SFTP, and that software would be

2- SSHFS-Win, which is the system that sits in the middle, between the SFTP server, and WinFsp which is an illusion of a hard drive on your windows machine ! it’s home on github is at https://github.com/winfsp/sshfs-win, To get the latest from this one, go here https://github.com/winfsp/sshfs-win/releases and look for the one that says latest (Not pre-release), download and install it

There is no software to install on the remote side, as most Linux systems already have the functionality ! and you have already setup a user in the previous post that I pointed you to a minute ago, So let us mount !

Now, you can (But don’t do it just yet) open file explorer in Windows, right click “This PC”, and click on Map Network Drive, A dialogue appears, enter your connection string, which should be something like

\\sshfs\username@serverhostname\

You should then be prompted with a password dialogue box, you enter the SFTP password, and you should now be all set, but why are we not doing this right now ? we are not doing this because when you create files in that drive, they will remotely have rwx permissions for owner, and no permissions for group or others, wo work around this, you need to pass the following arguments to the mount

webdev@10.10.20.41:/

create_file_umask=0000,create_dir_umask=0000,umask=0000,idmap=user,StrictHostKeyChecking=no

which is only available via command line and does not survive reboots, a better alternative is to use sshfs-win-manager, which seamlessly mounts those remote file systems using SFTP , the long and short of it is that it just works


Another program that has a different set of permission issues (I can write files, but can’t write to them again even though i own the files on the remote system and the permissions should allow) is SiriKali (https://github.com/mhogomchungu/sirikali), you should be able to find the line to download for your platform here (https://mhogomchungu.github.io/sirikali/)

SiriKali also allows you to use other types of authentication which are beyond the scope of this post

So in SiriKali, you need to fill the above information, luckily that information is loaded by default.

Remember to select the checkboxes you need,

Static IP on Hyper-v (Debian Guests)

One problem i face when developing using Hyper-v is that I need static addresses, and the default switch keeps changing the ip range

The simplest solution to this is to create a new switch of type internal ! this only connects the virtual machines to each other (Static IP etc…), and can not access the internet

Right after creating an INTERNAL switch in the switch manager, you go to “Manage network adapter settings” on the host computer, and assign an IP such as 10.10.20.1 to the adapter and a subnet of 255.255.255.0, no gateway, and nothing but those IPs.

Once that is done, you add a second adapter to all the virtual machines, and in the /etc/network/interfaces file, you leave eth0 the way it was (For internet) and add a metric 10 under the last line for eth0, then add the following stanza for the new adapter (Assuming eth1), eth 1 has a higher cost in it’s metric, so unless the remote is on the eth1 subnet, it will go through the eth0

auto eth1
iface eth1 inet static
 address 10.10.20.41/24
 metric 100

And you are done, those virtual machines can address each other with their 10.10.20.x addresses, and access the outside world via the other network interface.